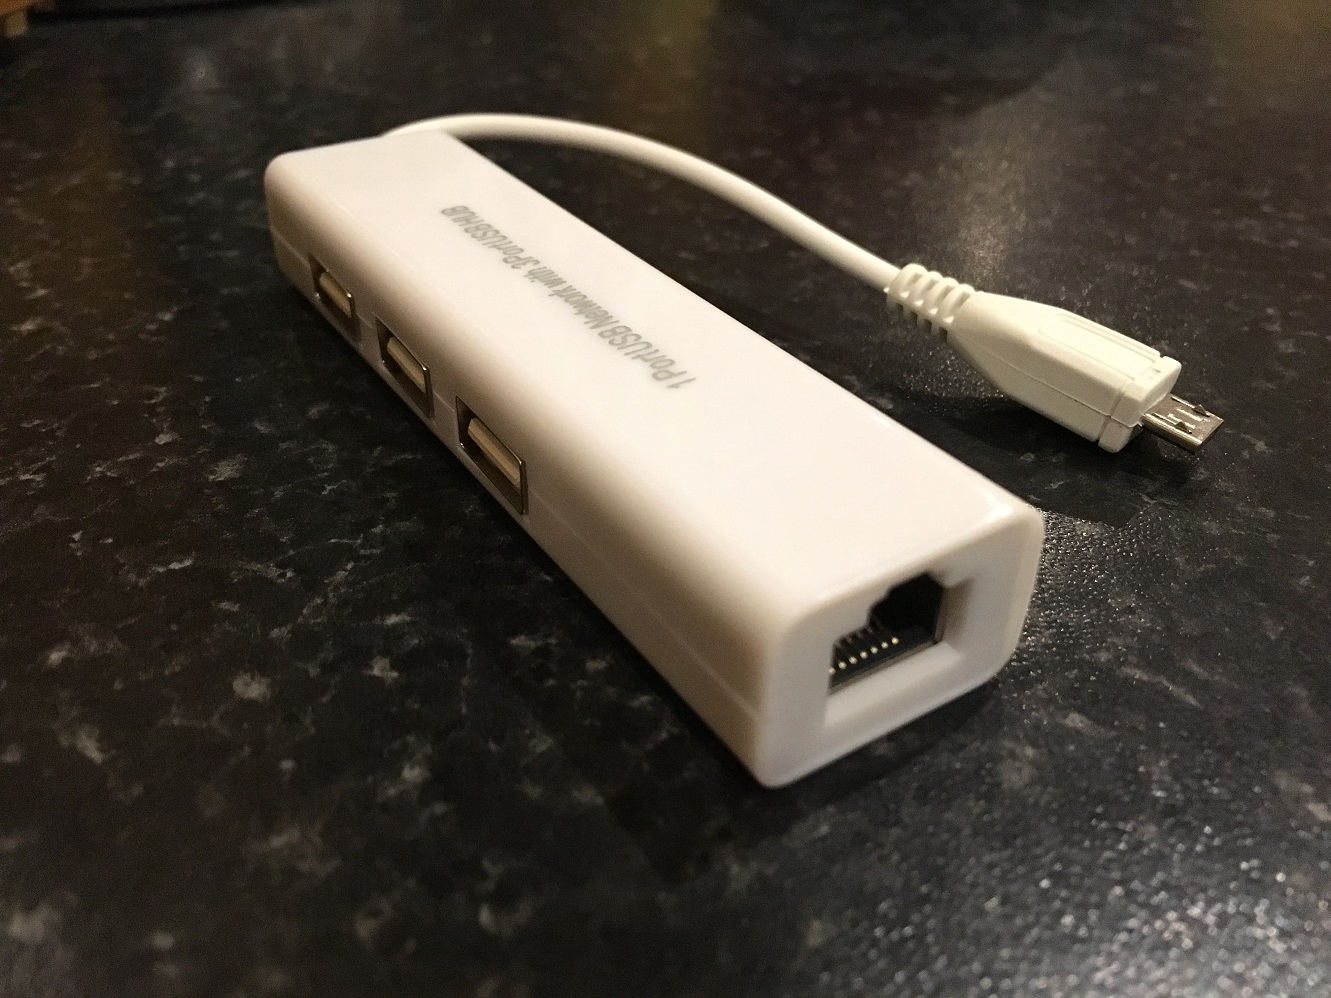
I’ve been a user of many Single Board Computers for a while now, and I always like to have the option of plenty of USB ports and and Ethernet port. I recently came across these devices, which combine 3 full-sized USB ports AND an ethernet port in the one device, terminate by a micro USB connector.
I use the Intel Edison quite a bit, it features as the brains of my most recent major project, a collaboration with other members of the Limerick MidWestMakers group to produce a smart garment called the Lightning Dress. While the Edison’s builit-in WiFi is perfect for that project, there are others where I’d prefer to have a hard-line Ethernet connection. And a few extra USB connections wouldn’t go astray either. Similarly, the new Raspberry Pi Zero is does not come with any full-size USB ports or an Ethernet port. So when I came across this device on Aliexpress for $3.20, I was very sceptical as to whether it would work or not. Well, I ordered three. One for my Edison mini breakout board, one for my Edison Arduino board, and one for my newly acquired Raspberry Pi Zero. All three boards have a micro-USB socket which takes a USB OTG adapter.
(Warning: because of it’s low-cost, there are issues. Be sure to read all the notes below if you decide to use them. And please let me know if you find any other issues)
So plugging in the adapter into the micro-USB socket and powering on the board, I could see the LED’s in the adapter activate, always a good sign.

It’s important to note that the Edison mini breakout board MUST be powered from the DC power connector, as the USB and battery connector does not power the micro-USB connector. That’s if you don’t want the hassle of using a 5v PSU with the adapter. You can always power the adapter externally, in which case you can probably use the battery connector on the mini-breakout board.
I then logged in on the console port, and did an ‘lsusb’ which gave:
root@edison:~# lsusb
Bus 001 Device 002: ID 1a40:0101 Terminus Technology Inc. 4-Port HUB
Bus 001 Device 001: ID 1d6b:0002 Linux Foundation 2.0 root hub
Bus 002 Device 001: ID 1d6b:0003 Linux Foundation 3.0 root hub
Bus 001 Device 003: ID 0fe6:9700 Kontron (Industrial Computer Source / ICS Advent) DM9601 Fast Ethernet Adapter
root@edison:~#
Good. No error -99. And now we know it’s a Kontron DM9601. Unfortunately, the Debian distribution I’m using on the Edison does not have the driver’s built-in, so I’ll have to get the Yocto source and re-build the relevant module. Something for later. But at least the hardware is successfully recognised, so it should be fine once I have the kernel module loaded. See the notes below for where you can get the kernel module.
Better news on the Raspberry Pi Zero, the driver was automatically recognised out of the box, and I was able to get an address via DHCP, and it was on the network as soon as it booted. So if you’re looking to get your new Pi Zero on-line, then this $3.20 adapter will do the job nicely for you, and you get the added bonus of 3 USB ports as well, all in one handy case.
Note: The adapters were $3.20 when I bought them first, at the time I published this article, they were up to $3.68. The Link to the seller I got them from on AliExpress is here. Oh, and they do FREE shipping. Bonus. 🙂
–Edit–
Conor O’Neill (@conoro) on twitter was good enough to let me know that this hub’s Ethernet may need a kernel patch applied to be reliable. There’s more info here.
Thanks for the info, Conor.
–Edit–
I’ve compiled the kernel module for the Intel Edison (including the patch suggested by @conoro), and you can download it here. Once you copy it onto your Edison, you insmod it or modprobe it, and when you do an ‘ifconfig -a’ you should see an eth0 interface. You can then configure it in the usual way by editing your /etc/network/interfaces file.
Here the dm9601.ko modules loaded:
 root@edison:~# lsmod
 Module Size Used by
 dm9601 13546 0
 ...
 root@edison:~#
Here’s the dmesg output:
 [ 7.393484] usb 1-1: new high-speed USB device number 2 using dwc3-host
 [ 7.414004] usb 1-1: New USB device found, idVendor=1a40, idProduct=0101
 [ 7.414033] usb 1-1: New USB device strings: Mfr=0, Product=1, SerialNumber=0
 [ 7.414054] usb 1-1: Product: USB 2.0 Hub
 [ 7.432080] hub 1-1:1.0: USB hub found
 [ 7.432415] hub 1-1:1.0: 4 ports detected
 [ 7.713576] usb 1-1.2: new full-speed USB device number 3 using dwc3-host
 [ 7.734673] usb 1-1.2: New USB device found, idVendor=0fe6, idProduct=9700
 [ 7.734703] usb 1-1.2: New USB device strings: Mfr=0, Product=2, SerialNumber=0
 [ 7.734723] usb 1-1.2: Product: USB 2.0 10/100M Ethernet Adaptor
 [ 7.799683] dm9601 1-1.2:1.0 eth0: register 'dm9601' at usb-dwc3-host.2-1.2, Davicom DM9601 USB Ethernet, 00:e0:4c:53:44:58
And here's the configured interface:

 root@edison:~# ifconfig
 eth0 Link encap:Ethernet HWaddr 00:e0:4c:53:44:58
  inet addr:10.4.11.116 Bcast:10.4.11.255 Mask:255.255.255.0
  inet6 addr: fe80::2e0:4cff:fe53:4458/64 Scope:Link
  UP BROADCAST RUNNING MULTICAST MTU:1500 Metric:1
  RX packets:1488 errors:0 dropped:0 overruns:0 frame:0
  TX packets:2160 errors:0 dropped:0 overruns:0 carrier:0
  collisions:0 txqueuelen:1000
  RX bytes:83969 (82.0 KiB) TX bytes:373212 (364.4 KiB)
 root@edison:~# ifconfig
–Edit–
One big drawback of using something so cheap is that they’re all manufactured with the same mac address. This means that traffic on your network will go nuts (technical term) if you use more than one of them on the same network. Luckily, there’s a quick configuration modification you can do on your system to overwrite the mac address with one of your choice every time your machine boots.
Use your favourite editor to open up a new file in /etc/udev/rules.d called 70-persistent-net.rules and add the following line:
SUBSYSTEM=="net", ACTION=="add", DRIVERS=="?*", ATTR{address}=="00:e0:4c:53:44:58", NAME="eth0", RUN+="/sbin/ifconfig eth0 hw ether de:ad:be:ef:f0:0d"
The last mac address in that line should be changed to something unique on your network. Then save it, and reboot your machine. The new mac address should be assigned the next time it boots.
It’s also worth noting that the mac address is persistent across warm reboots, so if you want to force a change, to to change from a non-default value, power cycle your board.
(Thanks to Drew for bringing the issue to my attention, and he also pointed out this 🙂
Nice. I’ll be ordering.
Gotta love aliexpress 🙂 Nice find, I’ll be grabbing some.
For those that don’t trust aliexpress for any reason, these are also available on ebay (free shipping too):
http://www.ebay.ie/itm/High-Quality-5-Pin-Micro-USB-To-RJ45-LAN-Ethernet-Network-Adapter-For-Tablet-PC-/151298081314?hash=item233a118222:g:3jMAAOxyuR5Ta7Tx
Here’s one on eBay with USB ports as well as Ethernet port, and a microUSB connector: http://www.ebay.ie/itm/USB-3-1-Type-C-USB-C-Multiple-3-Ports-Hub-with-Ethernet-Network-LAN-Adapter-F0-/221948560147?hash=item33ad2a4313%3Ag%3AQtIAAOSwcBhWUpbO