I’ve been working on camera hacks for a couple of year now. It started with the CameraPi, which was a Raspberry Pi mini-computer stuffed into an old battery grip for my Canon 5D Mark II Camera. Then came various variants on that, including a DIY time-lapse rail, the results you can see in the time-lapse section of this website. Theres’ also some water droplet photography, automated focus stacking, and even a bark activated door opener, not to mention the PiPhone.
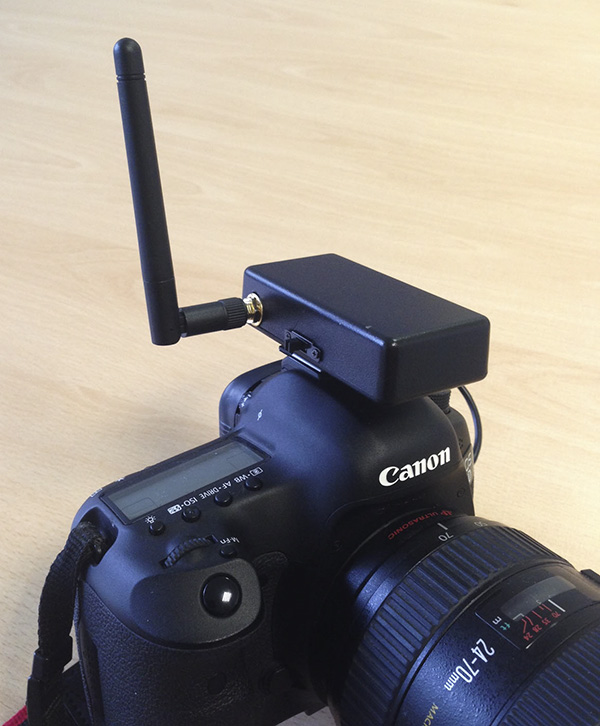
But the recent release of the new Intel® Edison system-on-module gives a new lease of life to old projects, and opens up new possibilities for future projects. I was lucky enough to get my hands on a couple of Edison’s (along with mini-breakout boards) from Sparkfun Electronics when they came (briefly) into stock a couple of weeks ago. I already had an idea on what I wanted to do with it, and that was to port the software I’d developed onto the Edison, and stuff it into as small a case I could manage, and mount it on top of the DSLR camera in the hot-shoe mount. Here’s the result:
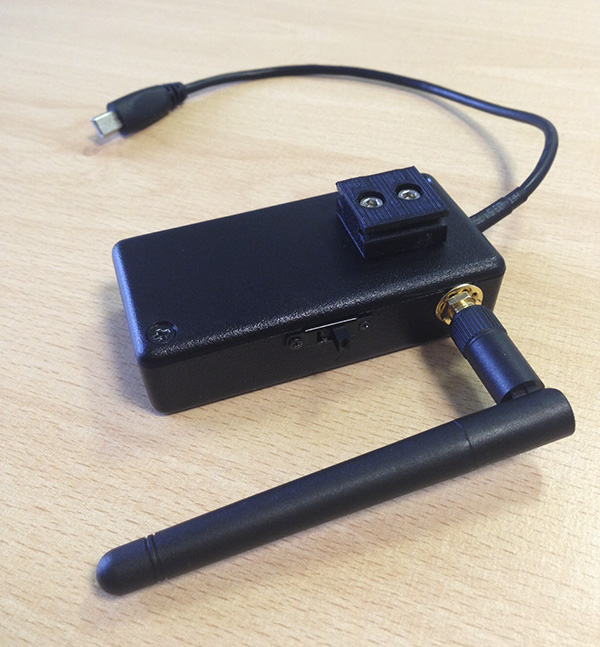
So, it looks innocent enough, just a black box on the hot-shoe of my camera. But the technology inside is the interesting bit. Have a look:
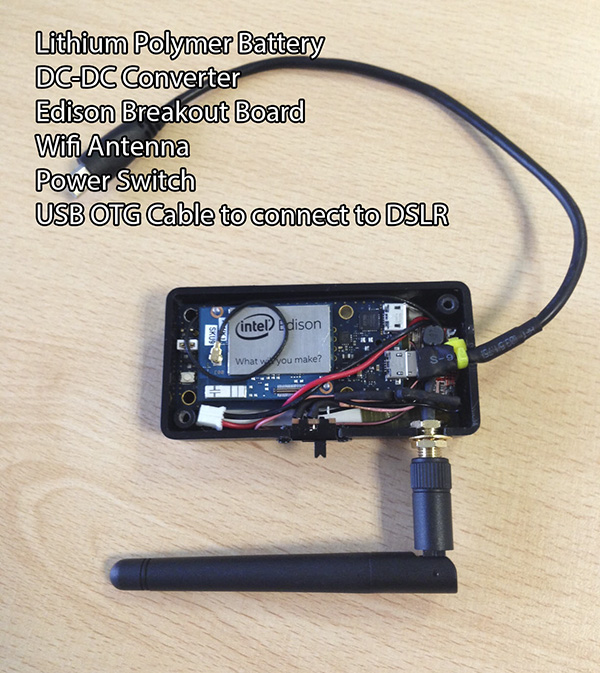
The box contains:
- Intel® Edison dual core system-on-module
- Intel® Edison mini breakout board
- DC-DC converter 3.7v – 5v
- a 1200 mAh Lithium Polymer battery.
- Custom made USB OTG cable
- Power switch
- 2.4GHz wifi antenna
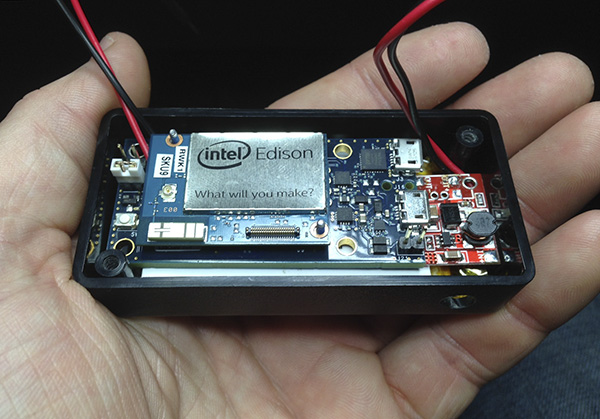
Based on initial quick measurements of the current draw, I reckon that the battery will last for about 8-10 hours on a charge. For this initial prototype, I have a DC-DC converter in there to convert from the LiPo’s 3.7 v to 5V, so that I can feed in the power to the ‘external’ power input on the Edison board. The breakout board can take a battery directly, but then the USB port will not work in host mode, which I needed for connecting the DSLR. The DC-DC converter allows me to get around this limitation, and it still all fit into the small box.
The USB OTG cable was needed for the connection to the camera, but the usual ones had a large usb connector on the end, into which you can plug another cable. That was too bulky ( and not very nice looking) for what I needed, so I split apart a couple of regular USB cables and made my own OTG cable by shorting pins 1 and 2 together. Much neater than an off-the-shelf solution.
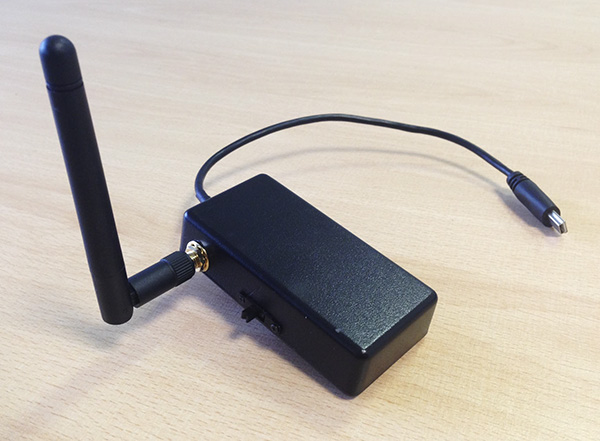
The antenna pigtail goes straight onto the U.FL connector on the Edison, and out to a standard 2.4GHz whip antenna. I didn’t necessarily need this, as there is a WiFi antenna built into the Edison PCB, but for the sake of much improved range, I added the external one. And I don’t think it looks too bad.
So then there was the mounting onto the Camera. Here’s where my new Mendel 90 3D Printer came into play. I took an old flash gun, made some quick measurements of a hot-shoe connector, and did a quick drawing in SketchUp. 10 minutes later I had a 3D printed piece that fit perfectly into my 5D MarkIII Camera. Perfect first time. That does’t happen very often. So I drilled a couple of holes in the case, and through the newly printed hot-shoe adapter, and I could then mount the box on my camera. A second iteration of the 3d printed pard had the holes built in, so no drilling was required. Here’s a better view of the 3d-printed part:
The bolts are just the right length so as not to stick up past the nuts in the bottom of the case, and were covered with thick tape so as not to cause any electrical problems with the other components in the case.
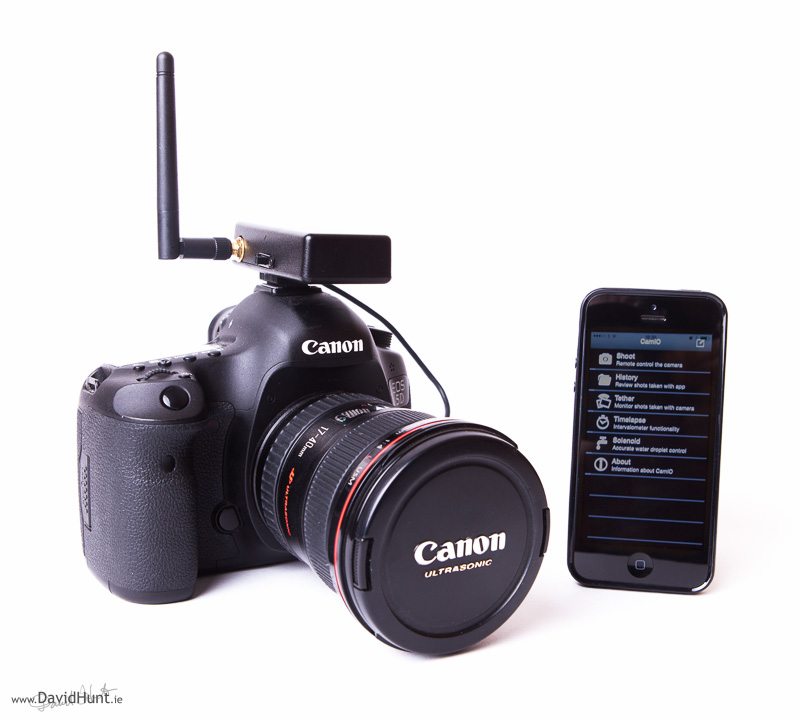
I’m using a custom iPhone app connected into server software running on the Edison which can control the camera, get thumbnails, get images, and do all sorts of stuff with them.
I presented this to the guys at work a couple of weeks before the European Maker Faire, and they took such a liking to it that I ended up showing it on the Intel stand at the Faire, along with another project we’d put together, which was a Timelapse Rail controlled by an Intel® Edison Arduino baseboard controlled via iPhone app.
About the Author:
By day I’m a senior embedded Linux software engineer. In my spare time, I take pictures, and play with gadgets and technology.
Twitter: https://twitter.com/climberhunt @climberhunt
Facebook: https://www.facebook.com/davidhuntphotography
Be sure to check out my other Raspberry Pi related articles, and if you like, you can subscribe by entering your email address at the top right of the page. 🙂
Do you plan to realese an how to ? 🙂
Laurent,
I sure do. I’m doing a couple of other HOWTO’s at the moment, and as soon as they’re done, I’ll get to work on this one! 🙂
Dave.
Hi, Dave:
Love your photo adaptations and this hits home for me particularly. I’m a news photographer in the U.S., shooting a lot of sports. Always on the lookout for a compact, efficient method to transfer images out of the camera back to my editors and this looks sweet. Will definitely be looking for your how-to, unless you need someone to beta test! thanks much for sharing. Randy
Your project looks great. The Edison Breakout Board edition lacks plenty in the documentation department. Would you be willing to exchange a few emails on getting through the initial setup?
I too (like Randy) am a pro photog in the U.S. working mostly in fashion and portraiture. Are you continuing work on wireless or ethernet file transfer? Mainly large file (RAW) image movement over wireless or wired connections? Possibly a localized, dedicated WIFI network?
Great work by the way…. I applaud your vision and knowledge!
tbyrd
Can you share details on the source of the case? I’m trying to find a place to store my edison in a similarly sturdy container.
http://www.maplin.co.uk/p/hammond-miniature-general-purpose-abs-box-1551-series-black-80x40x17mm-n80bq
Very nice! Look forward for how to doc. How do you communicate with the app, bluetooth?