In my previous article, I described how to set up a Raspberry Pi High Quality camera as an IP camera, and use IP Camera Adapter to plug this into your favourite video conference software. Now, go one better, with just a singe USB cable and zero networking!
Using a Raspberry Pi Zero with its on-the-go USB port in ‘peripheral’ mode, we can make the Pi look like a USB webcam. And what’s even better is that Windows will recognise it as a Camera and automatically install the drivers for you.
Here’s a video of the setup, with demo of it booting.
So the first thing to do is install RaspiOS on an SD Card, and enable the camera. There’s plenty of howto’s out there on how to do that. 🙂 This is usually done while the Pi is connected to a monitor so you can run raspi-config to enable the camera, ssh, configure WiFi, etc. Later on on the article we’ll power down the pi and plug it into a USB port on a Windows PC.
All the scripts needed for this are in a repo on GitHub. It’s a forked version of uvc-gadget, with additional systemd and configuration scripts.
So let’s checkout the software. As the pi user, checkout the repo. You may need to install git.
sudo apt-get update
sudo apt-get install git
cd /home/pi
git clone https://github.com/climberhunt/uvc-gadget.git
That will create a uvc-gadget directory, so lets configure the system now. We need to create a systemd service. I’ve supplied a file for this, which looks as follows. It just runs the piwebcam script, which creates the multifunction device and runs the uvc-gadget application.
[Unit]
Description=Start pi webcam service

[Service]
ExecStart=/home/pi/piwebcam
StandardOutput=syslog
StandardError=syslog
SyslogIdentifier=piwebcam
User=pi
Group=pi
WorkingDirectory=/home/pi/

[Install]
WantedBy=basic.target
To install this, just copy the file into the correct location, and enable it:
cd /home/pi/uvc-gadget
sudo cp piwebcam.service /etc/systemd/system/
sudo systemctl enable piwebcam
Next, edit the kernel command line parameters at /boot/cmdline.txt, adding the following at the end of the “console” line. This enables the on-the-go mode of the USB interface, and allows us to create a multi-fuction gadget on top.
modules-load=dwc2,libcomposite
Also edit the boot config, adding an extra line at the end containing:
dtoverlay=dwc2
Now to build the uvc-gadget app, just run ‘make’ in the uvc-gadget directory:
cd /home/pi/uvc-gadget
make
All going well, you should now have the uvc-gadget binary ready to be executed at the next boot.
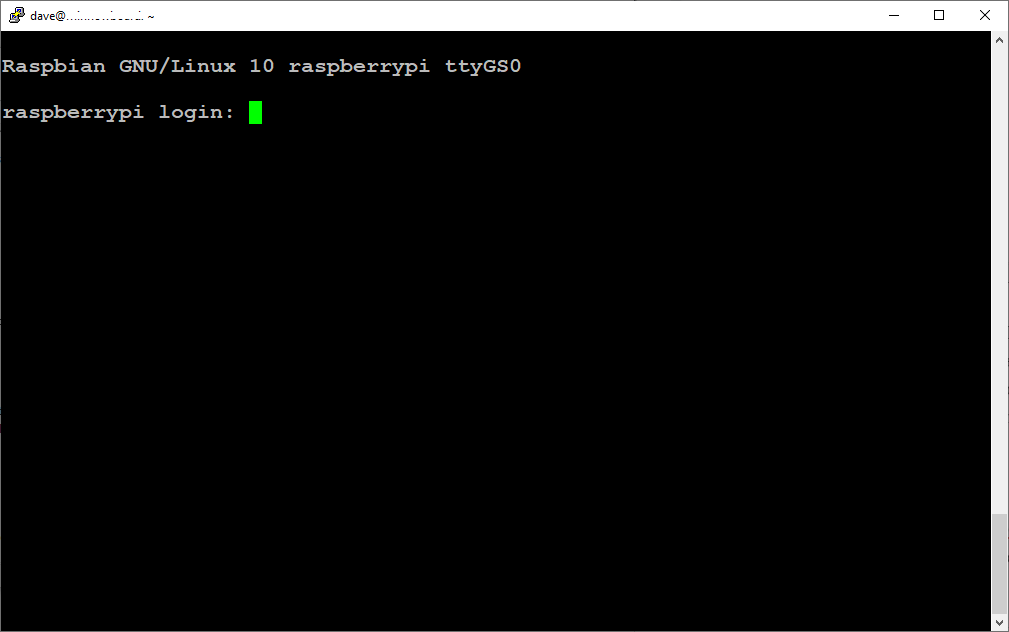
Next to set up the new serial device /dev/ttyGS0 to present a login prompt at boot. For that, we run the following command to cause systemd to run a getty (all one command, not separate lines)
sudo ln -s /lib/systemd/system/getty@.service /etc/systemd/system/getty.target.wants/getty@ttyGS0.service
One of the scripts that’s called as part of the piwebcam service startup us multi-gadget, which was published on the Raspberry Pi forums in a post by g.letourneur, and I added the extra serial gadget functionality from a few other posts. Here’s the script for reference. The main differences are the tweaks for 1080p video, and the addition of a few lines to create a serial device endpoint (acm.usb0).
!/bin/bash
mkdir /sys/kernel/config/usb_gadget/pi4
echo 0x1d6b > /sys/kernel/config/usb_gadget/pi4/idVendor
echo 0x0104 > /sys/kernel/config/usb_gadget/pi4/idProduct
echo 0x0100 > /sys/kernel/config/usb_gadget/pi4/bcdDevice
echo 0x0200 > /sys/kernel/config/usb_gadget/pi4/bcdUSB
echo 0xEF > /sys/kernel/config/usb_gadget/pi4/bDeviceClass
echo 0x02 > /sys/kernel/config/usb_gadget/pi4/bDeviceSubClass
echo 0x01 > /sys/kernel/config/usb_gadget/pi4/bDeviceProtocol
mkdir /sys/kernel/config/usb_gadget/pi4/strings/0x409
echo 100000000d2386db > /sys/kernel/config/usb_gadget/pi4/strings/0x409/serialnumber
echo "Samsung" > /sys/kernel/config/usb_gadget/pi4/strings/0x409/manufacturer
echo "PI4 USB Device" > /sys/kernel/config/usb_gadget/pi4/strings/0x409/product
mkdir /sys/kernel/config/usb_gadget/pi4/configs/c.2
mkdir /sys/kernel/config/usb_gadget/pi4/configs/c.2/strings/0x409
echo 500 > /sys/kernel/config/usb_gadget/pi4/configs/c.2/MaxPower
echo "UVC" > /sys/kernel/config/usb_gadget/pi4/configs/c.2/strings/0x409/configuration
mkdir /sys/kernel/config/usb_gadget/pi4/functions/uvc.usb0
mkdir /sys/kernel/config/usb_gadget/pi4/functions/acm.usb0
mkdir -p /sys/kernel/config/usb_gadget/pi4/functions/uvc.usb0/control/header/h
ln -s /sys/kernel/config/usb_gadget/pi4/functions/uvc.usb0/control/header/h /sys/kernel/config/usb_gadget/pi4/functions/uvc.usb0/control/class/fs
mkdir -p /sys/kernel/config/usb_gadget/pi4/functions/uvc.usb0/streaming/mjpeg/m/1080p

mkdir -p /sys/kernel/config/usb_gadget/pi4/functions/uvc.usb0/streaming/mjpeg/m/1080p

cat <<EOF > /sys/kernel/config/usb_gadget/pi4/functions/uvc.usb0/streaming/mjpeg/m/1080p/dwFrameInterval
5000000
EOF

cat <<EOF > /sys/kernel/config/usb_gadget/pi4/functions/uvc.usb0/streaming/mjpeg/m/1080p/wWidth
1920
EOF

cat <<EOF > /sys/kernel/config/usb_gadget/pi4/functions/uvc.usb0/streaming/mjpeg/m/1080p/wHeight
1080
EOF

cat <<EOF > /sys/kernel/config/usb_gadget/pi4/functions/uvc.usb0/streaming/mjpeg/m/1080p/dwMinBitRate
10000000
EOF

cat <<EOF > /sys/kernel/config/usb_gadget/pi4/functions/uvc.usb0/streaming/mjpeg/m/1080p/dwMaxBitRate
100000000
EOF

cat <<EOF > /sys/kernel/config/usb_gadget/pi4/functions/uvc.usb0/streaming/mjpeg/m/1080p/dwMaxVideoFrameBufferSize
7372800
EOF


mkdir /sys/kernel/config/usb_gadget/pi4/functions/uvc.usb0/streaming/header/h
cd /sys/kernel/config/usb_gadget/pi4/functions/uvc.usb0/streaming/header/h
ln -s ../../mjpeg/m
cd ../../class/fs
ln -s ../../header/h
cd ../../class/hs
ln -s ../../header/h
cd ../../../../..
ln -s /sys/kernel/config/usb_gadget/pi4/functions/uvc.usb0 /sys/kernel/config/usb_gadget/pi4/configs/c.2/uvc.usb0
ln -s /sys/kernel/config/usb_gadget/pi4/functions/acm.usb0 /sys/kernel/config/usb_gadget/pi4/configs/c.2/acm.usb0
udevadm settle -t 5 || :
ls /sys/class/udc > /sys/kernel/config/usb_gadget/pi4/UDC
That thread was and excellent source of information, and discussed some solutions using g_webcam and others using configfs. I went with configfs, as it seems to be the preferred options these days. Other references are listed below at the end of the article.
Now, power down your Pi Zero, and plug the USB cable into the USB port marked “USB” (not the one marked “PWR”), and the other end into your PCs USB port and see if the serial gadget comes up in Windows Device Manager. We’ll be running the Pi headless from now on with access via USB-serial or WiFi.
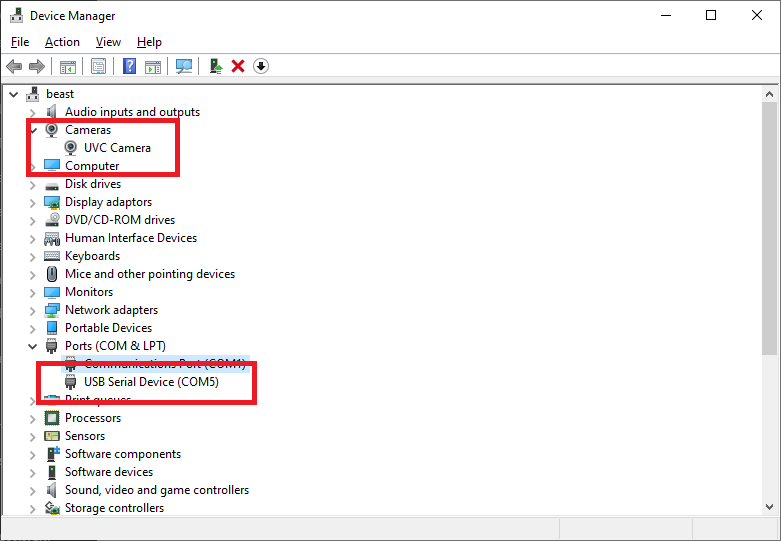
Here we can see that both the UVC camera and the serial device are now present in Device Manager on Windows. You should be able to connect a serial terminal to the Pi, and log in at the prompt. This saves you having to have the webcam connected to WiFi in order to login to tweak things. Use 115200 baud to connect.
Next, open up your camera app, and you should now see the output of the camera. You should be able to use the camera an any of your favourite video capture or video conferencing apps.
With a Raspberry Pi zero W, and using a class 10 SD card (~20MB/sec), the piwebcam boots in about 35 seconds. There’s lots of articles with tips and tricks on reducing this time, I didn’t manage to get configuration below 25 seconds, but didn’t spend too long at it. It should be possible to do better.
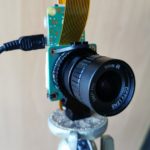
With the Raspberry Pi Zero at about £5 /€5.50, the Camera at £50/€55, and the standard wide(ish) angle lens at £25/€27.50, that’s a VERY decent interchangeable lens setup for about £80/€85.
Next to see if it’s possible to get 4k out of it! 😉
References:
https://www.raspberrypi.org/forums/viewtopic.php?t=148361 (most useful thread)
https://github.com/wlhe/uvc-gadget (forked from this version of uvc-gadget)
https://training.ti.com/sites/default/files/docs/USB-M6-USB-in-Device-Mode.pdf (really good presentation on Kernel UDC interface and configfs)
http://irq5.io/2016/12/22/raspberry-pi-zero-as-multiple-usb-gadgets/ (setting up multiple gadgets on one USB interface)
https://gist.github.com/justinschuldt/36469e2a89d95ef158a8c4df091e9cb4 (Good clean HOWTO on a very similar setup, was told about this link after I’d spend a few days trawling through the other references) 🙂
Dave,
Cheers. Great follow-on experiment/article. If I could ever get a RPi HQ camera I could join the fun; they seem to be in very limited supply. Probably someone is writing about how good they are and getting people excited!
Ric
Thank you.
I’m happy to report it also works with Ubuntu desktop and a Zero + older (cheap) v1 Camera.
Just plug it in, and show the stream with `mpv /dev/video0`
Another addition: on Ubuntu you need to stop ModemManager to get serial working.
systemctl stop ModemManager.service
Congrats for getting this working and thanks for the detailed post! I’ve been following the forum thread you linked to on raspberrypi.org for a few weeks. Unfortunately, I haven’t been able to get it to work with my Mac.
Have you tried running the uvc-gadget binary with a static Jpeg file instead of streaming from the camera? I’ve been trying this but can’t get it to show anything:
sudo ./uvc-gadget -f1 -s2 -r1 -d -i ../ColorBars.jpg -u /dev/video0
Where ColorBars.jpg is a 1920×1080 Jpeg image of some standard color bars.
I also noticed that in the multi-gadget.sh file you configure dwFrameInterval only for 2 FPS (5000000) but in your YouTube video you’re showing 30 FPS. How’s that working? Does Windows ignore the USB gadget FrameInterval?
Thanks for your insights.
David, a great thanks for cracking the riddle of getting this working. You don’t happen to own a Chromebook you could test this on do you? Been dying for a decent webcam solution for my Chromebox and this just might fit the bill …. if Chrome OS recognizes the USB device. Would hate to waste $100 on the camera hardware just to find out it is incompatible. Many thanks in advance either way, cheers!
How do I safely turn off my Pi again?
Hi, I usually log in with the serial console and power down that way. It would be a nice project to add a button on a GPIO to automatically shutdown.
You just unplug it. The linux core underneath has been stripped right down to basics so it does not need to go through the normal routine of disabling active processes and daemons. It has also been crafted so that the sudden power loss will not cause any risk to the sdcard.
Hi, thanks for this detailed tutorial and I got multiple cameras set up as USB cam, won’t scratch my head moving my laptop around for video conference at work now 🙂
because I have multiple RPi zero W and different types of camera modules I tested everything: V1, V2, 3rd party IR/non-IR/IR-cut cameras(with OV5647 sensor same as V1) & HQ – ALL work nicely. Of course as original uvc-gadget instructions indicated sometimes you need to manually adjust ‘brightness’ to get to the right exposure.
I found out that certain apps can’t differ from multiple cameras hooked up at the same time (Discord & Zoom definite only sees the first one but multiple camera entries are present). I don’t know how to meaningfully alter the script to make them appear differently, basic change of names in multi-gadget.sh would result in weird driver recognition behavior in Windows 10.
While this enables RPi zero to be used as USB webcam without worrying about security over wifi, I wonder if there’s an easy way to manually adjust the camera controls (ISO, WB, etc) on the fly, say, execute a few lines in the serial console.
Looking forward to your 4K cam implementation!
When I’m logged in over serial, I can issue the following commands to adjust various things…
/usr/bin/v4l2-ctl -c auto_exposure=0
/usr/bin/v4l2-ctl -c auto_exposure_bias=8
/usr/bin/v4l2-ctl -c contrast=20
/usr/bin/v4l2-ctl -c video_bitrate=25000000
I think that bitrate is the max possible with a pi zero, so no hope of 4K, I’m afraid! 🙂
Marvelous! I find the results of tuning it before activating camera in an app a bit different than changing it on the fly (when activated), but it’s really minor.
I am very happy with the result. Thanks again.
How can these setting changes be made permenant?
Hi Tim,
You can create a bash script to execute desired commands in one run, then set to autorun this script after system boot. There are a few feasible ways to do this in Raspberry Pi OS. I personally don’t do that cause I always manually adjust it before each use anyway. But online searches will help you by a long shot as it did to me.
Personally I found that setting contrast=0 to give me the best results. Depends on if you want the “dramatic” look or not with contrast=20
Hi is there any command list for other camera settings.
thanks.
So when i enter the comment for example “/usr/bin/v4l2-ctl -c exposure_time_absolute=5000” it does not effect at the windows side webcam.
please help at this issue. I need fix exposure time which is entered value.
Hi there!
Thank you so much for getting this working, I love my new 1080p DIY webcam! Any idea why I have to turn my Bluetooth off and on again to get it working after the webcam connects?
Hi Gerrit, I haven’t played with bluetooth, so can’t help, I’m afraid!
Really great post which helped no end! Had a few difficulties but got everything working as it should using a standard camera module v2 and pi zero v1.3.
That was until the windows camera app suddenly stopped presenting the image…seems to have developed difficulties with the serial connection
Thanks a lot for this really cool tutorial. I got it working in only 10 minutes!
However, I have quite a big latency: about 0.5s. Do you have the same results?
How do you think I could reduce this latency?
Hi, I don’t see the latency you’re seeing. Check the video, about 2 minutes in, I do a latency test. Maybe 200mS?
Hi!
Cool project! Two questions:
1. Is there anything specific about the Zero that is required for this to work, or could it also work with a regular RPi4?
2. Is there anything specific about the RPi camera that is required for this to work, or could it work with any video device that linux recognizes (v4l2, /dev/video0), assuming the video format is usable and the /dev/video0 hardware node is already configured properly?
I want to do a spin-off project and need more CPU power for video postprocessing. The plan is to make an external IP-Camera look like a dumb USB webcam to windows by streaming it to a loopback v4l2-device on the Pi and then passing whatever comes in on this virtual device on to the USB connector, which Windows identifies as a USB webcam.
The rationale is to offload h.264 decoding to the Pi, because my work laptop isn’t powerful enough to do that AND run Skype, and the IP-camera manufacturer’s bridge drivers are just ugly.
1. The Pi Zero uses it’s USB-OTG port, which I don’t think are available on the other modes, except the Pi4. The Pi4 can use it’s power USB-C port as USB-OTG, but you’re then powering the Pi4 off your laptop’s USB port, which may be too much power draw for the Pi4 to operate reliably, especially if you start using WiFi on it. Not really recommended. And the whole Idea was to just have a single cable between the Pi/Camera and the latop.
2. I don’t think you can do that. i.e. use the Pi to do hardware encode the stream from an external USB webcam, and then send that on through v4l2. But I could be wrong. It’s very straightforward with a picamera, I’d suggest getting your hands on one! 🙂
Hi! Thanks for the quick reply!
1. Right, I hadn’t thought about the OTG-port, since what we are doing is technically not really OTG at all. But you’re right, since we’re abusing the OTG driver for it, that might be a problem.
On the other hand the RPi4 has one and there are tons of ways to power a RPi nowadays, and I’m not really concerned about a clean, wireless look. Power is something to keep in mind, but I believe it can be solved.
2. I think you misunderstood my plan! I don’t want to use a USB webcam WITH the RasPi, I want the RasPi itself to look like a UVC-USB-Camera when I plug it into my computer (just like what you did above), but instead of taking the image from its “internal” camera, I want the RasPi to use some RTP stream over the internet as source, but tell Windows “Hey, I’m a cheap USB webcam, here’s your MJPEG video, none of your business where the pixels are actually coming from!”
So, my assumptions were:
– the RPi’s High Quality Camera creates a /dev/videoX device node on the RPi and provides a video stream to it through its driver in raspbian.
– uvc-gadget attaches to that video device node, picks up the stream that is provided, and forwards it to the PC attached to the USB port, making the computer think it’s talking to a class-compliant USB imaging device.
If everything so far is correct, then uvc-gadget shouldn’t care what the camera physically looks like, as long as there is a device node /dev/videoX in linux, and there can be a video stream read from that device node.
I can both fabricate the /dev/videoX device node and make a video stream come out of it (in a format of my choosing) using v4l2-loopback and ffmpeg, so my hope is that uvc-gadget can be persuaded to pick up and forward that video stream to the PC instead.
Any thoughts?
Might work or waste of time?
I did get the bit about wanting to use the Pi to emulate a webcam like I’ve done, but replacing the video source with something external. Thought it was a USB device on the PI rather than RTSP source. Did you see the previous blog where I used uv4l to present as an MJPEG camera? Laggy and low frame rate due to it being MJPEG rathen than h264. Interesting idea though.
I’ve been trying to do something similar (stream video into the Pi and feed it back through USB as a UVC device). But haven’t had any success with it. I haven’t been able to present even a static JPEG file
Take a look at the forum thread on the raspberrypi site that Dave liked above for a discussion around it:
https://www.raspberrypi.org/forums/viewtopic.php?f=38&t=148361&sid=c6efdfbb0b3f449dc32b74ce8dfbcd8a
Thanks for pointing out the link, I missed that one. Even though the discussion is old and partially outdated there is a ton of useful information there.
Seems to me like it should be doable in principle and most of my assumptions hold, but usb-gadget seems to be particularly picky about video format provided.
That is something that can probably be solved by doing inline conversions with ffmpeg’s “complex filters”. It’s a pain to set up if you don’t know exactly what you’re aiming for and we’ll have to see about lag of course, but the RPi4 is capable of transcoding 1080p h264 in hardware (and ffmpeg can utilize that if configured correctly), so it might not be so bad after all. We’ll see…
Ordering the hardware now, I will report back if I can get it to work. Doing this in my (non-existant) free time though, so it might be a while :o)
Thanks again for providing all these resources!
Just been trying this and sadly failing atm. Install process worked step by step and threw no errors at any point. Am using latest clean RaspiOS image. PC is Windows 10, plug in the USB cable and I get the standard Windows ‘USB Device not recognised’ popup. If I look in device manager, there is no camera, no serial device and a USB Device with ‘Unknown USB Device (Device Descriptor Request Failed) message. Not a lot to go on :/ Any ideas greatly appreciated.
Thx.
I get the same error unfortunately…
I commented with some info, but it hasn’t been approved, which will probably be the case for this post too.
Did you create the piwebcam.service as shown in the example above? I initially did that but noticed it is incorrect. There is a piwebcam.service file in the files you pulled with git. Use that one.
Also the “dtoverlay=dwc2” is added to /boot/config.txt in case you didn’t determine that. It isn’t 100% clear on that.
The only other thing would be it is important you pull the git repository as shown in home of the pi user. Don’t put it somewhere else.
Sorry, Michael. Lot going on, sometimes I miss posts, it’s not intentional. I need to moderate the comments in an attempt to protecting the website against trolls.
No worries, wasn’t sure if I missed something on the original post and thought a reply might get through.
Michael, thank you for your reply. I also noticed the inconsistency between the lines on the webpages vs the ones in the piwebcam.service file in git. Second time around I just left the file from the git as it is and didn’t create a new one as the webpage tutorial seemed to suggest. For the rest I followed the steps including /boot/config.txt, etc. But still, Windows 10 doesn’t see the USB device as a UVC Camera, just keeps stating ‘ Unknown USB Device (Device Descriptor Request Failed)’. I also tried the Zero-W/HQ-cam on a Max OSx Mojave system, but there it didn’t do anything either.
My Linux knowledge is limited to following tutorials that explain each step…
Is there a way (function commands, maybe) I can check all necessary functions are running?
I want to say initially I just ran the piwebcam app directly from the command line to test it when it initially didn’t work (because I used the services file example on here versus the one in the repository and I could tell it wasn’t running the program) and it doing the manual run it worked fine that way.
The only issue I had with Windows was my privacy setting in Windows 10 had the Camera blocked from apps. So once I disabled that, obs saw it.
Then I knew it wasn’t starting up properly so that was when I saw that the services file was the problem.
I would swear the error you list is what I got when I wasn’t starting the service properly.
I would recommend just trying to run the piwebcam program manually from the terminal on the pi. See if that works.
Thanks again. I worked on it some more. When manually starting piwebcam by entering the commands form the services file I got ‘UVC: device open failed: No such file or directory’
Searching that on the net brought me to try ‘sudo modprobe g_webcam’.
After that it (more or less) worked. Windows now has a UVC Camera. Only thing is that the screen is entirely black. When adding -d to uvc-gadget I get the colored lines as was mentioned in the Raspberry Pi forum thread.
So, I don’t know if the command I added manually is the right one or sufficient, but it’s at least a little step forward. Any other ideas would be greatly appreciated.
Glad you are getting closer.
I take it you have ran raspi-config and enabled the camera interface? And the camera works doing “raspistill -o cam.jpg” and the resulting cam.jpg has a valid picture in it?
Camera enabled in raspi-config and I get a clear picture using raspistill…
I got it working after adding a line with only ‘libcomposite’ to ‘/etc/modules’ file. Why and how, I don’t know. I did follow each step of the above tutorial. Anyone?
Hi Frank, did you add “modules-load=dwc2,libcomposite” to the cmdline.txt file? That should load libcomposite, and there should be no need to add it to /etc/modules. Rgds, Dave.
Hi David, thank you for all the work and this tutorial.
Yes, I double checked all the steps and I have added (using copy/paste) that line to cmdline.txt
It all seems strange. Could it be a different/newer RaspiOS? I have the latest on the RaspberryPi-org website.
So after getting the Zero W running as a webcam on Windows 10, I went on to try it on a Mac OSx Mojave computer. On there, using Quick Time Player, I only get a pixelated red or pink screen, and after switching between camera’s the screen turns black. Does anyone have this running on a Mac?
Answering my own question:
I had success on Mac OSx Mojave after setting ‘uvc-gadget‘ parameter ‘-s2’ to ‘-s1’.
Phhhhewww…
This was incredibly helpful. I’d followed the instructions exactly and was seeing that same device descriptor failed message. It looks like the big difference was the path to piwebcam
Just a couple notes on a couple hiccups I could see people having with the instructions if they haven’t got some linux experience.
Love what you put together though. Working great with my v2 pi camera. Looking forward to getting an HQ one with the wide angle lens.
1) The sample you show for piwebcam.service on this webpage differs from the one pulled from the repository. I copy/pasted the one here on your page, and found it wasn’t working. I noticed the ExecStart and WorkingDirectory lines being correct in the file pulled from the repository, not so on the sample here. So if someone uses the repository version they are good, but if like me they copied from the website, it will not work.
2) You might want to make it a bit more clear on the config.txt that it is actually /boot/config.txt that they should be adding “dtoverlay=dwc2” to. Some might get confused and not realize that you mean /boot/config.txt and put it in the previous /boot/cmdline.txt
Great job on this though. Very cool!
Would you happen to have the link to the repository for the new edit to the piwebcam.services file?
Or the texted you used in place of the blog?
Thanks,
Nick
Nick,
It is at https://github.com/climberhunt/uvc-gadget/blob/master/piwebcam.service
Hope that helps
Michael
Hi Dave
Thanks for your guide so far. I’m stuck at one point however. The last line of the script
ls /sys/class/udc > /sys/kernel/config/usb_gadget/pi4/UDC
Produces ‘Permission denied’
I’ve tried various permutations of sudo and bash to no avail, and my googling is exhausted.
Any Suggestions?
I eventually realised I was being dense and realised I didn’t actually need to run the script ♂️
Camera is working, but doesn’t seem to ‘transmit’ with Microsoft Teams. Shows the preview, looks OK at my end, recipients don’t receive ♂️
Did you ever get the Pi HQ webcam working with Microsoft Teams? My University will likely be moving from Zoom to Teams and I’d like to be sure it works with these programs before investing the needed time and money.
Thanks!
DaveN
I’m using this sd-card image https://github.com/showmewebcam/showmewebcam
with Teams for work over the last several weeks, seems rock solid! 🙂
1.6 image here: https://github.com/showmewebcam/showmewebcam/releases/tag/v1.60
Thanks, Dave, for your great articles and for this link. Just what I needed.
DaveN
I was able to get it to work with Teams by changing this line of /home/pi/uvc-gadget/multi-gadget.sh
/sys/kernel/config/usb_gadget/pi4/functions/uvc.usb0/streaming/mjpeg/m/1080p/dwFrameInterval
5000000
to
/sys/kernel/config/usb_gadget/pi4/functions/uvc.usb0/streaming/mjpeg/m/1080p/dwFrameInterval
333333
and rebooting the pi. It’s been working great for about a week now!
Thanks, Jacob!
Followed your very clear instructions through with my piZero attached via OTG/USB to PC via ssh. The piZero is recognised as a USB Ethernet RNDIS gadget as expected but device manager does not show a camera and I can not connect to the pi over serial. I tried enabling serial in raspi-config/interfaces to no avail. The camera takes a pic with raspistill. cmndline.txt loads another module before dwc2,libcomposite in case that is relevant.
Can anyone help me get this working?
I have spent the weekend working on this and have finally have it working very well.
I used a Raspberry Pi Zero and the Pi Camera Board V2 – 8 megapixel
The 2 main additions to the above guide lines would be
– adding g_ether to /etc/modules. I believe I read some issues with multiple ConfigS modules being used in the cmdline.txt file so I added it there to setup on windows, ssh in and use ICS to get an internet connection to update the Pi.
– the first thing to do is rpi-update and update the firmware. Once I did that, started fresh with the guide, then disabled the g_ether before rebooting.
I also rebooted with power only, connected to HDMI. There is a step by step gist created by Justin Schuldt called raspberry-pi-zero_as_webcam.md. that uses g.letourneur git repo. He has a debugging section and outlines a section about starting the pi, not using the OTG first. Previous attempts showed issues with piwebcam not starting and I think maybe the first start needs the OTG not connected
I ended up doing more or less the same. Set up over usb with g-ether loaded then remove and reboot. Serial connection then works as does the camera.
I have yet to figure out frame rate and contrast.
Hi David,
Have you test It with Skype or Teams desktop? I can see the camera signal but Teams does not transmit the signal.
Thanks
I’m seeing the same issue
Hi David,
1st of all, thanks for sharing your effort! Great work!
This used to work beautifully on mt RP4 but after the latest rpi-update it freezes the pi dead.
The the very last line in multi-gadget.sh causes the freeze:
> ls /sys/class/udc > /sys/kernel/config/usb_gadget/pi4/UDC
After this happened, I tried installing the latest Raspbian image from scratch, but to the same effect.
Does anybody have any ideas?
Thanks!
I had a problem with that line also
> ls /sys/class/udc > /sys/kernel/config/usb_gadget/pi4/UDC
I believe because it is attempting to do it, the first time, with the usb_gadget you can’t be using the gadget. (could be wrong but seems like plausible)
I updated the firmware and then first booted with power only and HDMI so I could access locally and check the logs.
Check the bottom of the article above for the “Good Clean HowTo” it has some steps to debug and ensure everything is doing what it should.
I then rebooted with the OTG into my PC and I got a signal.
That said, it only seems to work on Zoom and not on MS Teams. Also on zoom, I have to switch between the ratio before others can see my image even though I can see it OK they can’t for some reason.
Still working on different configurations to see what I get. Most of my issues may stem from me running on Linux desktop. I had to use a Windows 10 PC to set up as it has ICS(Internet Connection Sharing) built-in to the network manager. That made it easy to get the internet into the Pi.
Hope this helps
Thank you sooo much! I got it working and it is my first project with raspberry pi and I’m so excited!! I have a question tho, does the camera shut off when no app is using it? Or does it stay on regardless? I am worried about the longevity of the pi zero and the camera.
They stay on. But the Pi should last years even if on all the time. 🙂
Does anyone know if there’s a way to control the white balance and sensor gain while it’s setup as a webcam? By default the camera adjusts both automatically. I’d also like to say “Thank You” for making this work. The results are great – a really excellent webcam!
You might be interested in the Show-me-webcam project, a small firmware which does all the work for you, obviously based on David’s awesome efforts.
We’ve rewritten uvc-gadget with many new features. For example better performance and CPU load, multiple resolutions, support for uncompressed/YUYV, tested on Zoom, Jitsi, Skype, Firefox, Chrome, Teams and much more.
We always welcome people who’d like to test it and are looking forward to new ideas, comments and contributors.
https://github.com/showmewebcam/showmewebcam
Thank you. I have a mac and changed the parameter in the piwebcam file to s1 instead of s2 and it worked a treat.
Thanks for that! I see the file /uvc-gadget/piwebcam sets various controls for the v4l2 driver. I found here (https://www.raspberrypi.org/forums/viewtopic.php?f=43&t=62364) this list of available controls for the v4l2 driver that can be configured in the piwebcam file or adjusted from the command line:
User Controls
brightness (int) : min=0 max=100 step=1 default=50 value=50 flags=slider
contrast (int) : min=-100 max=100 step=1 default=0 value=0 flags=slider
saturation (int) : min=-100 max=100 step=1 default=0 value=0 flags=slider
horizontal_flip (bool) : default=0 value=0
vertical_flip (bool) : default=0 value=0
sharpness (int) : min=-100 max=100 step=1 default=0 value=0 flags=slider
color_effects (menu) : min=0 max=15 default=0 value=0
rotate (int) : min=0 max=360 step=90 default=0 value=0
color_effects_cbcr (int) : min=0 max=65535 step=1 default=32896 value=32896
Camera Controls
auto_exposure (menu) : min=0 max=3 default=0 value=0
auto_exposure_bias (intmenu): min=0 max=16 default=8 value=8
white_balance_auto_preset (menu) : min=0 max=9 default=1 value=1
image_stabilization (bool) : default=0 value=0
iso_sensitivity (intmenu): min=0 max=4 default=0 value=0
exposure_metering_mode (menu) : min=0 max=2 default=0 value=0
MPEG Encoder Controls
video_bitrate_mode (menu) : min=0 max=1 default=0 value=0 flags=update
video_bitrate (int) : min=25000 max=25000000 step=25000 default=10000000 value=10000000
JPEG Compression Controls
compression_quality (int) : min=0 max=100 step=1 default=30 value=30
Did the same with a stock install on a Pi Zero W with a Raspicam and got nothing. No Mac apps can see the camera. Is the single uvc-gadget (s2 to S1) the only thing you changed. Did you do anything on the Mac side?
I’m just starting… and wanting to connect it to my Mac (mini) – BigSur operating system. Cannot seem to find the camera (did change the s2 to s1). Hmmm.
I’m stuck.
Any suggestions on what I might check?
Nice writeup but I think you got the terminology about on-the-go wrong. On-the-go allows USB devices to act like USB hosts. So in case of Raspberry Pi Zero, on-the-go is the default mode of RaspiOS, which allows you to connect a keyboard, mouse of Wi-Fi dongle using the OTG adapter. If you want to make your Raspberry Pi act like USB webcam, so an USB device attached to another USB host, you have to switch the on-the-go off to make the USB controller in the Raspberry Pi act as an USB device.
Thanks for pointing out that inaccuracy! 🙂 On Wikipedia, sure enough, it says it says “USB OTG allows those devices to switch back and forth between the roles of host and device”.
I’ve changed the test in the article to “Using a Raspberry Pi Zero with its on-the-go USB port in ‘peripheral’ mode, we can make the Pi look like a USB webcam.”
Hi Dave,
thanx for the great article! I will soon give it a try.
One question – is there a reason that you use the serial device mode and not network over usb?
In the past, I used the network mode and it comes with the nice feature that you can give the pi access to the internet via your PC instead of WiFi.
I wanted to completely avoid networking because when using my VPN for work, I’m not allowed to bridge with other networks (i.e. the one over the USB link to the camera), so I went with the serial solution instead.
that makes sense 🙂
I now wonder if it is possible to do some image processing between the camera and the usb output.
Seems that, with ffmpeg, you could simulate a virtual camera which then can be feeded to the usbgadget 🙂
https://stackoverflow.com/questions/35480034/how-to-simulate-a-webcam-device
I guess this is something to play around for next weekend!
Thanx again for this great article!
In case you may need to rotate the camera image, may put this into crontab:
(crontab -e)
@reboot sudo v4l2-ctl –set-ctrl rotate=270
You can add the v4l2-ctl settings in the /home/pi/uvc-gadget/piwebcam file and they will execute when the piwebcam service starts
This is what I have in mine:
#!/bin/bash
#
sudo /home/pi/uvc-gadget/multi-gadget.sh
/usr/bin/v4l2-ctl -c auto_exposure=0
/usr/bin/v4l2-ctl -c auto_exposure_bias=8
/usr/bin/v4l2-ctl -c contrast=20
/usr/bin/v4l2-ctl -c rotate=180
/usr/bin/v4l2-ctl -c video_bitrate=25000000
/usr/bin/v4l2-ctl –set-ctrl horizontal_flip=1
#sudo /home/pi/uvc-gadget/uvc-gadget -f1 -s1 -r1 -u /dev/video1 -v /dev/video0
sudo /home/pi/uvc-gadget/uvc-gadget -f1 -s2 -r1 -u /dev/video1 -v /dev/video0
Hi. First of all: Great… is installed it to use it together with MS Teams… and it works great. Tanks to that, now to the but….
but… is it possible that there is a kind of digital zoom implemented in the RaspiPi Sourcecode? IT worked great, but i am really really hugh on the video screen… when i put another Pi+Cam (both 8MP + motionOS) next to it and compare the videos… you can see much more at the other one, and i am not really like “zoomed in”.
Does anybody can help?
cheers Ledan
Ledan
Have you tried it in an actual Teams Call?
I’ve found I can see myself in preview, but other Meeting members can’t see me.
Hola, you are right. Nobody told me until yet. The video is not visible for others, just for me, with teams. Can I fix this by myself?
I haven’t been able to fix it. My Google-Fu is usually strong but I haven’t found much for this. I think there are very few people using this with Microsoft Teams unfortunately
This is really an annoying problem.
The only workaround I have is to use Teams in the browser. Than the camera works perfectly.
Thank you very much for your project, I have just got it up and running with a Pi Zero W, Pi HQ camera and Win 10 laptop. My first attempt failed because I included an extra space after the comma in ‘modules-load=dwc2,libcomposite’. After retracing my steps and finding the error I rebuilt the uvc-gadget app and it all worked. Looking forward to using it as a webcam.
Thanks David, I’ve been hoping/waiting for a Raspberry Pi as USB webcam. Brilliant methodology.
To minimise boot time, Huan Truong has used buildroot to make a image. https://github.com/showmewebcam/showmewebcam
Not as easy to adjust however
Seems to be a bug with Linux kernel 5.4.51.
Solution: revert to older sys image.
I have downloaded following one:
2020-05-27-raspios-buster-lite-armhf
This was downloaded to Rpi4 SD card.
I didn’t update rpi, nor apt-get update/upgrade to keep Linux kernel 4.19.118 on board
Following David instructions worked as a charm 🙂
On newer kernel running this script was freezing raspberry 4…
Just for information Rpi4 has OTG on USB-C head.
after the success on Pi zero W cameras, I tried setting up a Pi 3 A+ just yesterday. First with latest RPi OS downloads from official website (Aug 20 release, Kernel 5.4.xx) and it was stuck during boot (not frozen but stopped at certain services and inconsistent everytime). I initially thought low voltage played much role in this and tried supplement power and no luck there either.
No surprise it worked just fine when I tried again on older RPi OS installation (May 27 release, Kernel 4.9.xx).
BTW the 3A+ OTG port is the full-size USB-A port. AND to ensure it’s in slave/peripheral mode, you will include:
dtoverlay=dwc2,dr_mode=peripheral
in “/boot/config.txt” (ref https://www.raspberrypi.org/forums/viewtopic.php?t=228267#p1400270 )
Hoping to locate whether it’s really the new kernel that messed things up, I held off kernel update by
>>> sudo apt-mark hold raspberrypi-kernel
and then did full upgrade as usual, after a powercycle the camera functions just as well.
From there, I unheld kernel update:
>>> sudo apt-mark unhold raspberrypi-kernel
and then performed full upgrade, this time kernel gets updated to 5.4.xx
Sorry I don’t pay attention to detailed kernel version since it ranges far from May 27th’ 4.9 kernel.
And as expected I got stuck at boot again. I haven’t tested on my working Pi zero W cameras but hopefully someone would benefit from us labmice.
Hello
I’m a full greenhorn and tried to get it running on a Rpi4. I run into two problems:
The first is about the USB ports which are different to the Pi Zero. Did I understand this correctly: I have the USB C port which is a slave (but the power supply at the same time). I also have 4 USB type A ports ports, which by default are masters. So I can’t connect there. So how do I finally have to connect? Is it the USB C and the laptop has to deliver enough power or can I switch a type A port to slave? But then I also would need a special cable with to male endings??
The second problem is, that my pi freezes after all the described installation at the new booting. How can I overcome this?
Hi David, great post!
I’ve set my PiZero up and its working like a charm. I’m using the new High Res Camera as well.
I’d like to use it as webcam with Jitsi Meet by connecting to the service via browser (in Windows).
It happens that Jitsi doesn’t accept the video signal and raises the following error:
“Failed to access your camera. Your camera does not support required video resolution.”
Is there any way to configure the camera resolution?
Hi David,
Great article, i have set this up myself and it works. Though i used the Raspberry Pi V1.3 camera Omni Vision OV5647 5MP and the performance in horrible in OTG UVC camera mode, there is lots of latency, low fps and the image quality is poor.
When using the same camera from raspiOS it performs perfectly and image quality is good. Not sure why there is a massive difference between raspiOS and it being used in OTG UVC camera mode.
I have tired tweaking the settings via the commands but that didn’t do much. Could it be the camera that is the issue, i dont wanna buy the v2 camera or HQ if i get the same performance issues via OTG any suggestions?
I have figure out the issue with my setup. It appears that older version of windows 10 build 1803 < the camera application has very poor performance. I used the same setup in teams, skype and discord and works perfectly.
I tested a newer version of windows 10 build 1909 and the performance in the camera app works great. This little issue sent me down the wrong rabbit hole of troubleshooting.
Great work on getting this working David! Now i am trying to make my own custom webcam mount for my monitor.
Hi Ivan
It doesn’t work with Teams. You can see your preview but it isn’t visible to other participants.
Thanks
I just did a test with it and you are correct.
I wonder why it doesn’t work in MS teams, would this be the same with other apps? As i only performed the test via the in app check camera feature, hence why i though it worked in teams.
I thought the same until my Boss asked why my camera wasn’t on : D
I haven’t got enough Linux knowledge to get it working unfortunately, and I don’t think there’s enough demand from people that do to use Teams. Shame though
Anybody able to crop and set the top and left of the frame? I found that you can modify the values of wWidth and wHeight in multi-gadget.sh to any custom value, but the frame is cropped from the top left corner. Ideally, I’d like to be able to crop the image directly in the middle of the frame.
I’ve looked at using –set-crop but get an “Inappropriate ioctl for device error”.
Thanks for the great set of instructions and research into getting things working. Got my Pi Zero W with HQ camera up in running as a webcam in no time at all. I’m also looking into doing an external power switch… time to order more parts :S
Hello. I’m working on an improved version of the rpi webcam. I’ve edited the source files for the uvc-gadget and is now able to modify more parameters than just brightness. My version of uvc-gadget now supports setting these v4l2 parameters – BRIGHTNESS, CONTRAST, SATURATION, SHARPNESS, GAIN, HUE, GAMMA, BACKLIGHT_COMPENSATION, POWER_LINE_FREQUENCY. But you also need to modify the kernel. More precisely, you need to set two values in the source code.
Thank you so much for this tutorial and your ongoing help in the comments! I had an issue with my setup, but was able to find the solution in the comments. My only lingering issue was the Pi Zero dangling dangerously from the ribbon cable. So, I designed this little “backpack” for the High Quality Camera that holds the Pi Zero and routes the ribbon cable around safely: https://www.thingiverse.com/thing:4630666
Is configuring h264 instead of mjpeg possible? I am concerned with files size.
To fix the output for Microsoft Teams and Skype, try changing the following values in /home/pi/uvc-gadget/multi-gadget.sh and reboot.
mkdir -p /sys/kernel/config/usb_gadget/pi4/functions/uvc.usb0/streaming/mjpeg/m/1080p
cat < /sys/kernel/config/usb_gadget/pi4/functions/uvc.usb0/streaming/mjpeg/m/1080p/dwFrameInterval
333333
EOF
cat < /sys/kernel/config/usb_gadget/pi4/functions/uvc.usb0/streaming/mjpeg/m/1080p/wWidth
1920
EOF
cat < /sys/kernel/config/usb_gadget/pi4/functions/uvc.usb0/streaming/mjpeg/m/1080p/wHeight
1080
EOF
cat < /sys/kernel/config/usb_gadget/pi4/functions/uvc.usb0/streaming/mjpeg/m/1080p/dwMinBitRate
995469360
EOF
cat < /sys/kernel/config/usb_gadget/pi4/functions/uvc.usb0/streaming/mjpeg/m/1080p/dwMaxBitRate
995469360
EOF
cat < /sys/kernel/config/usb_gadget/pi4/functions/uvc.usb0/streaming/mjpeg/m/1080p/dwMaxVideoFrameBufferSize
4147789
EOF
Nice! Thanks!
I was thinking about this less than 30 minutes ago, thinking “I really hope someone can make that Raspberry Pi work with teams”. I’ll be so pleased if this works! Thanks Alex
You’re welcome! It took a bit of fiddling but it was the 30fps (dwFrameInterval as 333333) that seemed to do the trick. As others have pointed out, it’s a weird bug as both Skype and Teams show a preview but just fail to actually send to any recipients! Zoom, web browsers and the Camera App seem to be a bit more tolerant.
One other comment, my Pi Zero W would have kernel paging panics after about 15 minutes of continuous use but underclocking with arm_freq=600 in /boot/config.txt resolved that issue.
This is a superb tutorial Dave – thank you. I’ve also had great success with the dedicated image at https://hackaday.io/project/174479-raspberry-pi-0-hq-usb-webcam which has some excellent optimisations for constant usage.
All in all, I’d agree it’s a fantastic low cost solution for a high quality product!
Thanks so much for fixing this. Just tested it with a quick meeting and works a treat no more black screen.
You are a legend.
Hello,
first of all, thanks for the instructions @David.
If others also have the problem that the webcam breaks the connection after a few seconds, then you should use a higher quality USB cable. That gave me some problems.
Has anyone already tried to transfer a higher resolution? I would like to use the full resolution of the camera. The frame rate doesn’t matter, it can be less than 10 or 5.
Do I only have to replace 1920 with 4056 and 1080 with 3040 in the following places, or do I have to make adjustments in other places?
cat< /sys/kernel/config/usb_gadget/pi4/functions/uvc.usb0/streaming/mjpeg/m/1080p/wWidth
–1920–> 4056
EOF
cat< /sys/kernel/config/usb_gadget/pi4/functions/uvc.usb0/streaming/mjpeg/m/1080p/wHeight
–1080–> 3040
EOF
Hi. Thank you for the great guide!
Just wondering if anyone is able to get this configuration working? UVC + g_ether or UVC + ECM? Basically, UVC + ethernet instead of UVC + serial.
Thank you!
Hi, I didnt try, as I specifically did NOT want an Ethernet gadget in the mix, as that might lead to bridging networks between my VPN’d laptop and the network on the Pi, and that’s against my company’s rules. It might be possible though, but I haven’t tried it.
Yes, you did mention it. Sorry that I forgotten about it. Too many websites. Thanks for getting back to me. Just wondering, if it is something you could perhaps, one day, explore for me please. I think many others are having the same issue and no websites can give a good examples. Most are saying, hey, USB OTG, you can have Serial + Ethernet gadgets and more and when we come to try this UVC + ethernet (g_ether); nothing works and not sure why.
While at it, I can configure so that Device Manager sees both UVC + g_ether but Win10 CameraApp gives “Something went wrong error code: 0xa00f4271 (0x80070018).
Any idea of how can see this from the Pi side to see what logs or events that gone wrong on uvc-gadget? I do not know what to look for.
Again, thank you for your time; I really appreciate it! 🙂
Dave, thanks for the great post! I was successfully able to use my RPI+PiCam as a webcam on Windows. However, I can’t make it work on Linux (Ubuntu 18.04.5) on an Nvidia Jetson AGX Xavier (aarch64). Other users have reported success on Linux, but I would assume that they were using an x86/x64 architecture. Other UVC cameras work properly on the Jetson. I don’t have an Intel Linux system at home, so I can’t easily test if the Pi works with that. Do you have any suggestions on how to troubleshoot the issue on the Jetson?
Some additional info. I was able to test the RPI with an Intel laptop using a LiveCD, and it still doesn’t work as a webcam (it works as a serial device).
I will answer my own question. I was finally able to troubleshoot the issue and the problem was not the camera, nor the Jetson, but Cheese. This thread the same problem I’m experiencing:
https://forums.developer.nvidia.com/t/raspberry-pi-v2-csi-camera-works-but-not-with-cheese-ubuntu-18-04-jet-pack-4-5/167618
And the same issue occurs on an Intel laptop, so it looks like a problem with Cheese.
Anyway, the camera works properly with VLC, as suggested at this link: https://help.ubuntu.com/community/Webcam
Would it be possible to use the Zero as an IP camera at the same time? So both stream over IP and through USB? If so, how would I set this up?
A really cool thing! Is there a way just to stream the middle of the image (like the Region of Interest with raspistill)? I found a comment about croping above, but that will not solve it. I need to somehow zoom in and see the FULL details of the central region of the sensor on my video.
PS: First I had the problem, that it froze while booting, but I could overome it with loading the older 2020-05-27-raspios-buster-lite-armhf and with not doing any updates as it was decribed above by Tomasz.
Awesome work! I’m struggling to get it to work but I’m using the Pi Zero Camera so I think this might be the problem, has anyone manged to get this to work using the Pi Zero Camera?
Thanks for this tutorial, it has worked great!
One thing I would like to do is to have the option to take still images periodically using the full sensor array (4056 x 3040 pixels for HQ camera) instead of streaming the 1080p video and for those image to be available on the host computer(not the PI zero). Is there a good way to do this or suggestions for where to start looking.
Thanks,
Zach
What about the option of adding a microphone to the raspberry pi?
Is that possible?
I finally got this working on my PC, but is there any reason I shouldn’t be able to use it with another rpi? My RPI4 doesn’t seem to be recognizing it.