 Here’s a very basic howto on switching a DC motor on/off with a Raspberry Pi using a transistor.
Continue reading “HOWTO – Switching on/off a DC motor with a Raspberry Pi”
featuring the blog where you learn from my mistakes…
Here’s a very basic howto on switching a DC motor on/off with a Raspberry Pi using a transistor.
Continue reading “HOWTO – Switching on/off a DC motor with a Raspberry Pi”
 I’ve had the idea of embedding a computer DSLR camera for a couple of years now, but for whatever reason I never got around to implementing it, mostly due to the cost of small single board computers. Until now, that is. With the release of the Raspberry Pi, embedded computing has all of a sudden become much more affordable. At €35 for the computer, it’s far cheaper than any of it’s rivals.
So what I’ve done is take an old (broken) battery grip that I had lying around (for my Canon 5D Mark II), and made a few modifications to it so I could fit the Raspberry Pi SBC (Single Board Computer) into it.
Continue reading “Camera Pi – DSLR Camera with Embedded Computer”
 Another in the before-after series. This shot was taken for a challenge competition, where the theme was “Pink”.
 This is the first in a series of before-after shots, where I show the shots that came out of the camera, and the final image, describing how I got from one to the other.
 Here’s something that might be of interest, and will help speed up some parts of your workflow.
Get a faster memory card, and the means to get the images onto your PC as quick as possible.
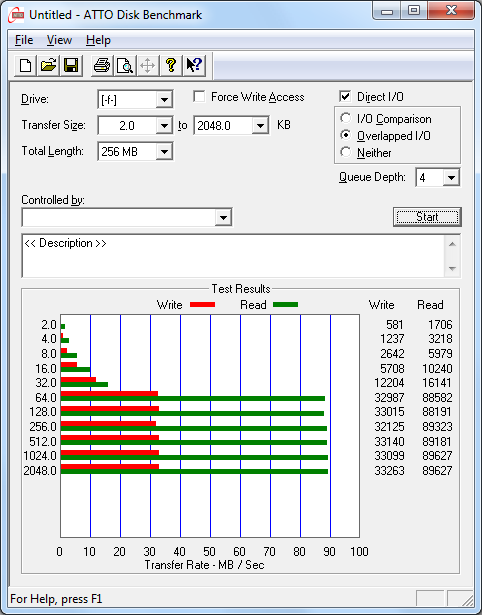
I recently ordered a couple of 600x Duracell 8Gb Compact flash cards from 7DayShop.com….
They give a read speed of 90MB/sec. and are only £20.99 for 8Gigs. That’s great value. Continue reading “Workflow Tip – Fast cards & Fast readers”
 (See edit below regarding DSLRBot. A slightly more expensive solution, but quite a bit better…)
Recently I was awe-struck by a Time-lapse video by Terje Sorgjerd I saw which was shot around El Teide on Gran Canaria early in 2011. Looking around on the internet, I saw various solutions for time-lapse, including some very fancy rigs for moving the camera as it’s shooting the images. What I needed was something that could trigger my dSLR camera to take an image at regular intervals over a few minutes up to a few hours. The camera already has a port for a remote switch, so I needed some way to trigger that at regular intervals. There are solutions available as cheap as €50 on e-bay, so I wanted to see if I could do it a lot cheaper than that. Continue reading “DIY Intervalometer for Time-lapse videos”
I was browsing around Woodies DIY today, and spotted the following clamps for sale in the bargain basement bin at €2.99 each. The spring was strong, and the plastic seemed like the good quality, hard wearing type. So I purchased a couple with some DIY strobist work in mind…

I noticed that the plastic jaws did not have a lot of grip:

so I super-glued some bits of bicycle inner tube to them:

Next, onto the real reason for the purchase, the double flash mount. This consisted of a simple tube bolted onto one of the handles of the clamp.

The copper tube has a bit of timber jammed into it so the tube would not collapse when brolly/strobe holders are screwed onto it. A simple drill hole in the clamp handle, and a drill hole throuhg the copper pipe, with a 30mm bolt and wingnut to hold them together. All done. The Result:

They’re probably not as strong as the Manfrotto clamps, and would struggle to hold a flash out horizontally, but the have no problem holding two strobes in the position of the image above, and would have no problem hanging from something. Not bad for under a fiver….
After coming away from a workshop with Ciaran Whyte, I decided to have a go at making a tri-flash hotshoe adapter, seeing as we made so much use of one during the day. I happen to have 3 Canon 540EZ strobes which I could use. To make things easier to mount, I wanted to trigger all three strobes with a single radio receiver. To do that, I’d have to modify my strobes to give them a sync port.
The following images show the steps I went through to make the mod. First I’ll start with a before-and-after shot:

On the strobe on the right you can see the 3.5mm jack socket mounted in the red plastic window. I had to remove some parts of the strobe to make room for the socket, but since I only ever use these in manual mode, they bits I took out are never used. Undoing the 4 small screws at the bottom allows you to remove the hotshoe section of the strobe.

Next images shows the part of the strobe that we’re going to discard to make room for the sync port:

Next, we pop out the red window, drill a 6mm hole in it (I used a special acrylic drill bit I had lying around. Using other bits may crack this piece, be careful.

Next, we solder two wires from the jack socket to the relevant pins on the hotshoe. In the 540EZ, the ground is the blue, and the trigger is the red.

Red window, re-inserted, soldering all done, about to re-assemble:

All back together. You might want to test the connections before putting it all back together.

Testing the new sync port with a 3.5mm jack to 3.5mm jack cable. The Cactus V4’s have a 3.5mm jack socket on the side. Nice feature.

All three 540EZ’s complete, with new 3.5mm jack socket sync port.

The next task was to make up a 4-way 3.5mm jack plug cable, so I could connect all three strobes together to one wireless receiver:

Followed by a few quick test shots:

The 3-flash setup will give you one of two things:
The 4-way cable saves on radio receivers.
I then took the three hotshoe/umbrella adapters I had, and thought about mounting them on the same tripod. The simplest method at hand was two pieces of cylindrical hardwood bolted together into a cross. That way I could put one ‘end’ into the tripod, and put the three hotshoe adapters on the other three ‘ends’. (oh, and I cut the bolt for a neater finish).

Twisting the strobes and adapters into the following configuration, I ended up with a pretty neat setup, all triggered off a single radio receiver.

I put set this up beside a 400W studio head I have at home. To test the power of the tri-flash setup, I set all strobes to max power and adjusted my camera until I got the histogram right. I then put the 400W head at full power, and to my surprise, the histogram was just about the same! (maybe 1/3 stop more). So, with the 3-strobe setup I’ve now got about 400W of portable power. 🙂
—EDIT—
I was having problems triggering all three flashes with the single Cactus V4. The refresh times went to hell. One or two flashes, fast recycle time (@ 1/128 power) but with three connected, several seconds.
I recoon the problem was down to poor isolation between the trigger and the three strobes, so I designed and built the following prototype:

Shown in the above (very messy) circuit is a 3V power supply, two 3.5mm jack sockets (one for trigger, one for flash 4-way cable), a 50 ohm resistor, and a small low-voltage transistor. The theory was that when the trigger closed the circuit, 3 volts would be gated into the transistor, causing the output to short circuit, triggering the 3 strobes simultaneously. This triggering would be electrically isolated from the output of the wireless receiver, so it should recover quicker, allowing me to trigger rapidly in succession, which it was not when directly connected. At least that’s the theory. And low-and-behold, the damn thing worked. There was no-one more surprised than myself. I could now trigger all three strobes as fast as my thumb could press the transmitter test button. No delays from the receiver. Wicked. So I then pulled out an old eBay trigger that no linger worked, mounted all the above circuit into a nice neat box, and got some well earned sleep.
Here’s the enclosure showing the batteries, and input and output 3.5mm sockets.

I used the existing power switch as well, so the circuit is completely dead unless I switch it on. I’m wondering if I should integrate the transistor and resistor straight into the drigger? Might be a squeeze, but it’s one less set of batteries to be worried about. Maybe it’s not worth the trouble. Anyway, I was happy to have solved my trigger speed issue.
I’ve also tested this with a set of borrowed Yongnou RF-602 triggers. These do not exhibit the same issue as the Cactus V4’s, in that I can plug the 4-way cable directly into the receiver and it will trigger all three strobes without any recycle delays. These must have better trigger isolation than the Cactus V4’s. No need for the extra circuit. –Edit– You can add Cactus V5’s to the list that don’t need the extra circuit.
Needs Circuit:
Doesn’t need extra circuit: