DIY Double Flash Clamp (under €5)

I was browsing around Woodies DIY today, and spotted the following clamps for sale in the bargain basement bin at €2.99 each. The spring was strong, and the plastic seemed like the good quality, hard wearing type. So I purchased a couple with some DIY strobist work in mind…

I noticed that the plastic jaws did not have a lot of grip:

so I super-glued some bits of bicycle inner tube to them:

Next, onto the real reason for the purchase, the double flash mount. This consisted of a simple tube bolted onto one of the handles of the clamp.

The copper tube has a bit of timber jammed into it so the tube would not collapse when brolly/strobe holders are screwed onto it. A simple drill hole in the clamp handle, and a drill hole throuhg the copper pipe, with a 30mm bolt and wingnut to hold them together. All done. The Result:

They’re probably not as strong as the Manfrotto clamps, and would struggle to hold a flash out horizontally, but the have no problem holding two strobes in the position of the image above, and would have no problem hanging from something. Not bad for under a fiver….


Enabling Infiniband on Ububtu 10.10

I do mention in my tagline that this blog may contain some information about computers, so you’ve been warned. The following article is quite technical, and may not be of interest to the photography contingent that might otherwise be interested in my blog articles. I posted this because I spent several days attempting a particular task, and managed to get it down to a few simple instructions. It may be useful for other attempting the same task. Continue reading “Enabling Infiniband on Ububtu 10.10”

Major Ink Longevity Research Programme now FREE

I just got the following great news. Mark H. McCormick-Goodhart, Director of the ink longevity research programme at http://www.aardenburg-imaging.com/news.html has just announced that the subscription fees to the website are being dropped, making all the research available to everyone for free. I’ve been a member since the very early days, and found in invaluable as a printer in selecting (or ignoring) third party inks for use in my printers.
I’m actually in the proud position of having the WORST EVER performing sample in that programme. An Ink I played around with in the early days was a dye ink off eBay called “Signal Inkjet”. I got one batch of 600ml (6x100m bottles), which cost me $10. It seemed ridiculously cheap, and sure enough, the results matched the price. The prints were only good for a few months before visible fading and colour shifting kicked in. Once I saw the results coming out of Aardenburg-Imaging, I quickly switched back to Claria OEM inks (I was on a dye printer at the time) which was showing much better results.

I eventually got and Epson R2880, and as a result of this research, I settled on Inkjetfly inks, as they have longevity and colour gamut approaching that of OEM inks for a fraction of the price. I’m printing all of my on photos now (and also for some friends, club competitions, etc.) and we’re very happy with the results.

Also, if you’re interested in the research, you can also submit your own samples. It’s very interesting to see your own samples put through the light-fade tests, and you can be confident that the results are accurate and measured in a way that can be compared consistently with the other samples under test.

Have a look at Mark’s website, and take a look at the longevity test results. It lists a huge amount of printer/paper/ink combinations, invaluable for someone who’s looking to use third party inks at either an amateur or professional level.

Infiniband at Home (10Gb networking on the cheap)

Would you like to have over 700MB/sec throughput  between your PCs at home for under €110? That’s like a full CD’s worth of data every second! If you do, then read on….

–edit–

Since this article was originally written, I’ve found the real-world throughput of infiniband from a windows machine and an ubuntu machine gives me a max of 135MB/sec, just under twice my 1gbps ethernet (75MB.sec). Thats with a raid array capable of 350MB/sec on the linux side, feeding a samba link to the windows machine at 95% CPU. So, it falls a lot short of the desired 700MB/sec that I thought may be possible. It’s not possible with IP over Infininband. And iSER isnt available on windows, so no SRP targets could be used, which uses RDMA. So a whole lotta research leading to block walls and 135MB/sec max.

—end edit—

With the increasing amout of data that I have to manage on my computers at home, I started looking into a faster way of moving data around the place. I started with a RAID array in my PC, which gives me read-write speeds of 250MB/sec. Not being happy with that, I looked a creating a bigger external array, with more disks, for faster throughput. I happened to have a decent linux box sitting there doing very little. It had a relatively recent motherboard , and 8 SATA connectors.  But no matter how fast I got the drives in that linux box to go, I’d always be limited by the throughput of the 1Gb ethernet network between the machines, so I researched several different ways of inter-PC communication that might break the 1gbps barrier. The 1GB ethernet was giving me about 75MB/sec throughput.

The first I looked at was USB 3.0 (5 gbit/s). While that’s very good for external hard drives, there didnt seem to be a decent solution out there for allowing multiple drives to be added together to increase throughput. We are now starting to see raid boxes appear with USB3.0 interfaces, but they are still quite expensive. To connect my existing linux box to my windows desktop, I’d need a card with a USB 3.0 slave port so that the external array would look like one big drive, and max out the 5Gbps bandwidth of a USB 3.0 link . However, these do not seem to exist, so I moved onto the next option.

Then I moved on to 10G Ethernet (10 gbit/s). One look at the prices here and I immediately ruled it out. Several hundred Euro for a single adapter.

Fibre channel (2-8 gbit/s). Again the pricing was prohibitive, especially for the higher throughput cards. Even the 2Gbps cards were expensive, and would not give me much of a boost over 1Gbps ethernet.

$_12
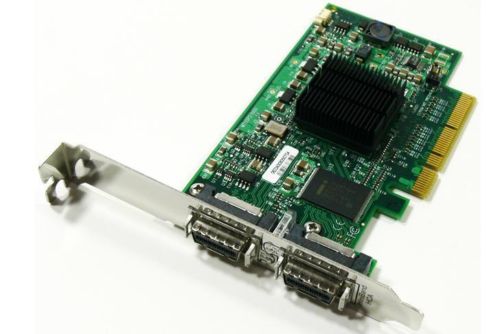
Then came Infiniband (10-40 gbit/s). I came across this while looking through the List of Device Bit Rates page on Wikipedia. I had heard of it as an interconnect in cluster environments and high-end data-centres. I also assumed that the price would be prohibitive. A 10G adapter would theoretically give up to a Gigabyte per second throughput between the machines. However, I wasn’t ruling it out until I had a look on eBay at a few prices. To my surprise, there was a whole host of adapters available ranging from several hundred dollars down to about fifty dollars. $50? for a 10Gig adapter?   Surely this couldn’t be right. I looked again, and I spotted some dual port Mellanox MHEA28-XTC cards at $35.99. This worked out at about €27 per adapter, plus €25 shipping. Incredible, if I could get it to work. I’d also read that it is possible to use a standard infiniband cable to directly connect two machines together without a switch, saving me about €700 in switch costs. If I wanted to bring another machine into the Infiniband fabric, though, I’d have to bear that cost. For the moment, two machines directly connected was all I needed.

With a bit more research, I found that drivers for the card were available for Windows 7 and Linux from OpenFabrics.org, so I ordered 2 cards from the U.S. and a cable from Hong Kong.

About 10 days later the adapters arrived. I installed one adapter in the Windows 7 machine. Windows initially failed to find a driver, so I then went on the OpenFabrics.org website and downloaded OFED_2-3_win7_x64.zip. After installation I  had two new network connections available in windows (the adapter was dual-port), ready for me to connect to the other machine.

Next I moved onto the Linux box. I won’t even start with the hassle I had to install the card in my linux box. After days of research, driver installation, kernel re-compilation, driver re-compilation, etc. etc., etc., etc., I eventually tried swapping the slot that I had the card plugged into. Low and below, the f&*cking thing worked. So, my mother board has two PCI-Ex16 slots, and the infiniband adapter would work in one, but not in the other. Who would have thought. All I had to do then was assign an IP address to it. –EDIT– here’s a quick HOWTO on getting the fabric up on Ubuntu 10.10. About 10 minutes should get it working – http://davidhunt.ie/wp/?p=375 –EDIT–

Without a cable (it still had not arrived from Hong Kong), all I could do was sit there and wait until it arrived to test the setup. Would the machines be able to feed the cards fast enough to get a decent throughput? On some forums I’d seen throughput tests of 700MB/sec. Would I get anywhere close to that with a 3GHz dual core athlon to a 3GHz i7 950?

A few days later, the cable arrived. I connected the cable into each machine, and could immediately send pings between the machines. I’d previously assigned static IP addresses to the infiniband ports on each machine. I wasn’t able to run “netperf”, as it didn’t see the cards as something it could put traffic through. So I upgraded the firmware on the cards, which several forums said would improve throughput and compatibility. Iwas then able to run netperf, with the following results:

root@raid:~# netperf -H 10.4.12.1
TCP STREAM TEST from 0.0.0.0 (0.0.0.0) 
port 0 AF_INET to 10.4.12.1 (10.4.12.1)
port 0 AF_INET : demo
Recv   Send   Send
Socket Socket Message Elapsed
Size   Size   Size    Time     Throughput
bytes  bytes  bytes   secs.    10^6bits/sec
87380  16384  16384   10.00    7239.95

That’s over 7 gigabits/sec, or over 700MB/sec throughput between the two machines!

So, I now have an Infiniband Fabric working at home, with over 7 gigabit throughput between PCs. The stuff of high-end datacentres in my back room. The main thing is that you don’t need a switch, so a PC to PC 10-gigabit link CAN be achieved for under €110! Here’s the breakdown:

2 x Mellanox MHEA28-XTC infiniband HCA’s @ $34.99 + shippping = $113 (€85)

1 x 3m Molex SFF-8470 infiniband cable incl shipping = $29 (€22)

Total: $142 (€107)

The next step is to set up a raid array with several drives and stripe them so they all work in parallel, and maybe build it in such a way if one or two drives fail, it will still be recoverable (raid 5/6). More to come on that soon.

References:
http://hardforum.com/showthread.php?p=1036510049
http://www.zdnet.com/blog/storage/build-a-10-gbit-home-network-for-1100/284
http://www.gossamer-threads.com/lists/drbd/users/19594
http://www.mellanox.com
http://www.openfabrics.org

Flash Full Power Recharge in around 3 Seconds

I’d been hearing good things about various types of battery packs recently, quantum, etc. Being the diy enthuasist (cheapskate) that I am, I thought that I’d research building an external battery pack for my strobes. These usually take the form of a 12v battery pack which connects into the external port of the flash (Canon’s, in my case), reducing recycle time, and giving longer battery life, depending on the type of battery used. I looked initially at the Canon pack, which takes 6 AA batteries. These come in at well over €100. I had a look around on Flickr and other sources, but nowhere could I find a circuit that would feed this external port on my Canon flashes.

Anyway, I had a look on eBay for some canon knock-offs, and I spotted an “iShoot” model for €23 (incl shipping from Hong Kong), which takes 8 AA batteries,  so I ordered one. It duly arrived, but unfortunately  it was DOA. The LED on the unit would not illuminate, and I saw no change in the recharge time of the flash. I contacted the seller, and he was really great about it. He said that the shipping back to Hong Kong  was quite expensive, so I could keep the faulty unit, and he would ship me out a replacement. That arrived about a week later.

Better this time. Upon plugging it in to the flash, and powering the flash on, the LED lit up on the battery pack. With fully charged NiMH AA’s, I was now getting recycle times of just under 3 seconds with the flash set to full power.

I had a look at the internals of the faulty unit, and with the complexity of the circuit board I was looking at, there was no way I would be able to replicate that in a DIY fashion. So the easiest thing for me to do was to just simply order one pack for each of my flashes. At €23, that’s not too expensive, and certainly a lot cheaper than the Canon units. I used this unit over the weekend, and popped off several hundred shots at 1/4 power, and was still getting very fast recycle times. I’m definitely going to order more of these units for my next strobist shoot.

Useful Photography Tools #1 (ViewRanger GPS)

I’ve been using ViewRanger on my smartphone for about a year now. ViewRanger is a GPS application that allows you to download maps onto your phone, and then use them to plan trips, guide you around an area, all the usual stuff you do with a GPS. The nice thing about ViewRanger is that they’ve licenced the maps from Ordinance Survey Ireland (OSI), so you can get the 50000:1 (Discovery series) in a variety of delivery options. I initially bought the app and a “tile pack” for about €20, which lets you download small portions of Ireland on-demand. This is very handy when you’re planning a trip to a particular area, in that you can download the tiles for the area ahead of time. However, if you want to be completely flexible, you can get all 26 counties of Ireland for €150, and Northern Ireland for a further £40. This has the added advantage that when you’re out and about, you don’t need to download any data over the 3G connection, saving you data charges, and works well in remote areas where there’s no data connection available. I got the 26 counties recently, which came in a 1.1GB zip file. Uploading to the phone was a breeze, and once the registration key was entered I could zoom into anywhere in the 26 counties with 50000:1 detail.

The maps, as everyone who’s ever used a Discovery Series map knows, contains a tremendous amount of detail. They have all the contours, roads, Holy Wells, Promontory Forts, etc etc. Also, all the back roads that you’d ever need to get as close to the coast as possible if you’re into coastal landscape photography. Some of the roads shown are so small as to not be drivable. To have this level of detail available on your phone is a great aid to the Irish Landscape Photographer. I’ve found some great new areas (new to me, anyway) using ViewRanger. It’s also great to use in conjunction with The Photographers Ephemeris (TPE) to plan sunrise and sunset trips, as TPE uses Google Maps which requires a 3G connection and does not have the detail contained in the OSI 50000:1 maps. I’ll probably do a small article on TPE as a follow-up to this, as it’s another very handy tool for photographers.

If you order ViewRanger for the iPhone, you need to go through the app store, which will cost you €20, but that comes with a pack of tiles for the country of your choice. For other phones, the app is free, but you pay seperately for the map packs. Tile packs are about €20, individual provinces are about st£60, Northern Ireland is about st£40, and WholeEire.zip will cost you st£120 (€150).

I initially started using ViewRanger on a SonyEricsson Satio touchscreen smartphone, but then got and iPhone 4. ViewRanger support were very quick in helping me move my licences from the Satio to the iPhone at no extra charge.

For more information , see the official ViewRanger website at www.viewranger.com.

(Images used with permission)

Canon 540EZ DIY Sync Port

After coming away from a workshop with Ciaran Whyte, I decided to have a go at making a tri-flash hotshoe adapter, seeing as we made so much use of one during the day. I happen to have 3 Canon 540EZ strobes which I could use. To make things easier to mount, I wanted to trigger all three strobes with a single radio receiver. To do that, I’d have to modify my strobes to give them a sync port.

Adding sync-ports to the 540EZ strobes

The following images show the steps I went through to make the mod. First I’ll start with a before-and-after shot:

On the strobe on the right you can see the 3.5mm jack socket mounted in the red plastic window. I had to remove some parts of the strobe to make room for the socket, but since I only ever use these in manual mode, they bits I took out are never used. Undoing the 4 small screws at the bottom allows you to remove the hotshoe section of the strobe.

Next images shows the part of the strobe that we’re going to discard to make room for the sync port:

Next, we pop out the red window, drill a 6mm hole in it (I used a special acrylic drill bit I had lying around. Using other bits may crack this piece, be careful.

Next, we solder two wires from the jack socket to the relevant pins on the hotshoe. In the 540EZ, the ground is the blue, and the trigger is the red.

Red window, re-inserted, soldering all done, about to re-assemble:

All back together. You might want to test the connections before putting it all back together.

Testing the new sync port with a 3.5mm jack to 3.5mm jack cable. The Cactus V4’s have a 3.5mm jack socket on the side. Nice feature.

All three 540EZ’s complete, with new 3.5mm jack socket sync port.

The next task was to make up a 4-way 3.5mm jack plug cable, so I could connect all three strobes together to one wireless receiver:

Followed by a few quick test shots:

The 3-flash setup will give you one of two things:

  • Three times the power
  • Or, faster recycling times.

The 4-way cable saves on radio receivers.

The Triple-Flash adapter

I then took the three hotshoe/umbrella adapters I had, and thought about mounting them on the same tripod. The simplest method at hand was two pieces of cylindrical hardwood bolted together into a cross. That way I could put one ‘end’ into the tripod, and put the three hotshoe adapters on the other three ‘ends’. (oh, and I cut the bolt for a neater finish).

Twisting the strobes and adapters into the following configuration, I ended up with a pretty neat setup, all triggered off a single radio receiver.

I put set this up beside a 400W studio head I have at home. To test the power of the tri-flash setup, I set all strobes to max power and adjusted my camera until I got the histogram right. I then put the 400W head at full power, and to my surprise, the histogram was just about the same! (maybe 1/3 stop more). So, with the 3-strobe setup I’ve now got about 400W of portable power. 🙂

—EDIT—

Extra Circuit to get Cactus V4s to trigger 3 540EZs

I was having problems triggering all three flashes with the single Cactus V4. The refresh times went to hell. One or two flashes, fast recycle time (@ 1/128 power) but with three connected, several seconds.

I recoon the problem was down to poor isolation between the trigger and the three strobes, so I designed and built the following prototype:

Shown in the above (very messy) circuit is a 3V power supply, two 3.5mm jack sockets (one for trigger, one for flash 4-way cable), a 50 ohm resistor, and a small low-voltage transistor. The theory was that when the trigger closed the circuit, 3 volts would be gated into the transistor, causing the output to short circuit, triggering the 3 strobes simultaneously. This triggering would be electrically isolated from the output of the wireless receiver, so it should recover quicker, allowing me to trigger rapidly in succession, which it was not when directly connected. At least that’s the theory. And low-and-behold, the damn thing worked. There was no-one more surprised than myself. I could now trigger all three strobes as fast as my thumb could press the transmitter test button. No delays from the receiver. Wicked. So I then pulled out an old eBay trigger that no linger worked, mounted all the above circuit into a nice neat box, and got some well earned sleep.

Here’s the enclosure showing the batteries, and input and output 3.5mm sockets.

I used the existing power switch as well, so the circuit is completely dead unless I switch it on. I’m wondering if I should integrate the transistor and resistor straight into the drigger? Might be a squeeze, but it’s one less set of batteries to be worried about. Maybe it’s not worth the trouble. Anyway, I was happy to have solved my trigger speed issue.

I’ve also tested this with a set of borrowed Yongnou RF-602 triggers. These do not exhibit the same issue as the Cactus V4’s, in that I can plug the 4-way cable directly into the receiver and it will trigger all three strobes without any  recycle delays. These must have better trigger isolation than the Cactus V4’s. No need for the extra circuit. –Edit– You can add Cactus V5’s to the list that don’t need the extra circuit.

Needs Circuit:

  • Cactus V4

Doesn’t need extra circuit:

  • RF-602
  • Cactus V5


USB 3.0 is the Future

From reading this blog, you might get the idea that I’m obsessed with disk speeds as of late (on the cheap, I might add). Well, you’re not wrong there. And to add to my obsession, I got my hands on a USB 3.0 PCIExpress card and a SATA-USB 3.0 atapter today. After installing the drivers for the card, I then attached a SATA hard drive to the adapter, and plugged it into the PC. Up it came no problem, so the first thing I did was to run ATTO Disk benchmark tool against the drive. Here are the results:

Sustained 80-85MB/sec read/write. It sure beats the hell out of USB2.0, at about 25-30MB/sec.  I don’t have a decent drive available to test it faster, but theoreticaly USB3.0 is good to >400MB/sec.

Next purchase will probably be a USB3.0 Compact Flash reader, but they’re very thin on the ground. Oh, and some good and fast Compact Flash cards to go along with it. 🙂

UPDATE:

I got a new motherboard, which has USB 3.0 built in, and this week Aldi were doing a special on USB 3.0 1TB drives for €79.99. I got one, and the following is the ATTO benchmark results:

More RAID Wonderfulness…

With the increase in the amount of data taken up by images on my PC data throughput has become a real problem. Dozens of seconds to load and save files, not to mention 25 seconds to open Photoshop. Each image I take of my camera is 25-30MB, and when I am working on a file, it can be 600-800MB for a few days until I’m happy with it and compress it down to a flattened image at about 100MB. Loading and saving these files can take up to a minute on my PC.

I started looking into increasing the performance of editing images on my PC. The main prompt was the fact that my 1TB drive in my pc crashed (I had 3 backups so nothing lost). I took a look at what the main bottlenecks were, and it seemed that disk speed was one of the main problems. Having discussed RAID systems in a previous post, I thought I’d investigate setting up a striped array as a second drive on my desktop. Striping allows two disks to be “merged” showing up as 1 disk to windows, but the underlying writes are spread across each disk, theoretically doubling the read/write performance.

First of all I discovered that Windows 7 now includes software RAID, and the benchmarks on the web showed that the speeds were very similar to the motherboard RAID solutions for both RAID 1 and RAID 0 (Mirroring and Striping), so I had a go at that. Well into the process of copying about 800GB of data around the place to make two spare drives, I found that only Windows 7 Professional and Windows 7 Ultimate allow RAID configurations. I’ve got Windows 7 Home Premuim, which DOES NOT have RAID functionality. Bummer.

Then I took a closer look at my motherboard, and it has a RAID controller built in. But there was a problem, I couldnt enable the RAID controller in the BIOS without causing my current windows installation to give me a BSOD (Blue Screen of Death) at boot. Even the solution suggested by Microsoft didnt help, so I freed up another 500G SATA drive and installed a fresh copy of Windows 7 on it, after enabling the RAID controller on the motherboard. It was very particular about the BIOS settings to get windows recognising the SATA CD-ROM drive and the hard disk. Anyway, once I got the settings right, I installed Windows and the nVidia RAID software.

Then, I installed my two 1TB drives (Seagate Baracuda 7200.12’s, €80 each in Maplin), and kicked off the nVidia storage manager. This is quite a neat piece of software that allows easy configuration of arrays based on spare disks in the system. I started a couple of self tests on the disks, which checked out healthy. I chose not to migrate any existing data, so the new striped array was created in seconds in the nVidia storage manger. Then using the Disk Manager in windows to create a couple of partitions on that disk, which again, took seconds, I started up the ATTO Disk Benchmark Utility. Previously I had tested the Seagate disks individually, giving me a max speed of about  125MB/sec. With the new striped array, this was increased to 247MB/sec! Success.

ATTO Benchmark for Striped 1TB Seagate Baracuda 7200.12’s

Because it’s a striped disk, I need to be very careful to have a good backup policy, because if one of the disks in the array goes, I lose ALL the data. If youwant data security, dont use RAID 0 (striping).

Now to install Photoshop CS4, then the CS5 upgrade, and restore my photos onto it and see what kind of performance improvement I get in general use editing pictures. I don’t expect the actual processing to be much quicker. but organising images in bridge, generating previews, loading/saving large TIFFs should all be improved.

Once Photoshop was installed, I started it up, it took about 8 seconds. Closing and opening again took about 4 seconds. This is an improvement from about 25 seconds from cold with my old 80MB/sec boot drive.

Adobe bridge seems a lot snappier now, with previews loading much quicker. Also, I can now save a 1GB TIFF file in under 10 seconds. I reckon this will save me a several days over the course of a year 🙂